Onboarding workflow
In this tutorial you create a workflow that helps you onboard business terms. A community manager analyzes the business term and, if valid, moves it to the appropriate domain, where the subject matter expert verifies the business term and accepts it or sends it back to the community manager.
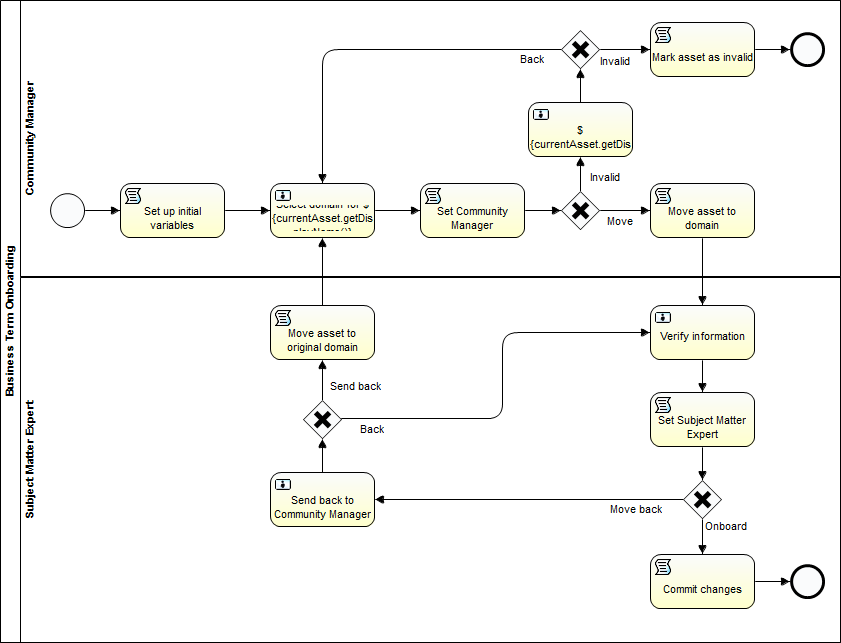
- You start the workflow by setting up some process variables like the universally unique identifiers (UUIDs) for the Community Manager and Subject Matter Expert roles, the Invalid and Candidate statuses and the Definition attribute type. This also makes the variables available for later edits on the workflow definition page in Collibra Platform.
- You then retrieve the business term name and definition, the name of the user who created the asset and you change the status of the asset to candidate. You assign all the information to process variables so you can return the asset to this initial status. You also create an empty process variable that will hold any comment the subject matter expert might have for the community manager.
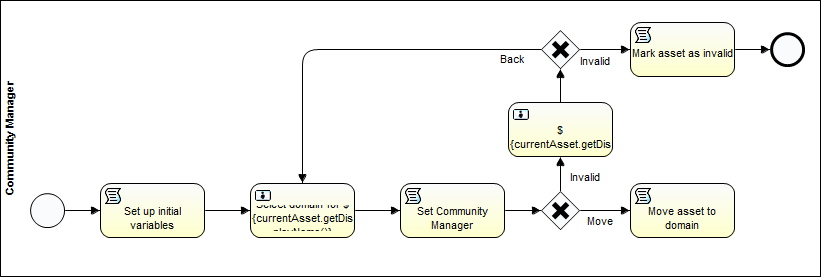
- With the first user task, you ask a community manager to select a domain for the new business term from a drop-down list of available domains. The community manager has the option not to move the business term and change its status to invalid. As you will be reusing this same task in case the subject matter expert sends back the business term, you also add the comment variable you created in the previous task to the user task documentation.
- Before moving forward, you create a process variable to capture the current user so you can assign the next community manager user task to the same person.
- You create a script task to change the status of the business term to invalid and add the reason of the community manager as a comment on the asset page.
- If the community manager decides to onboard the business term, you add a script task that moves the business term to the selected domain.
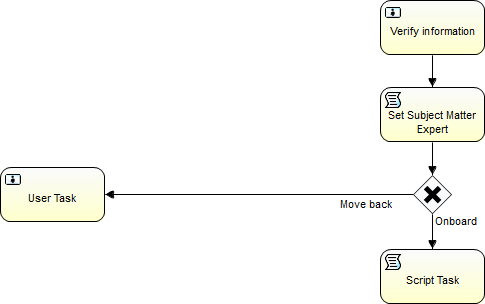
- With a new user task, you ask the subject matter experts of the business term's new domain to verify that the asset belongs there by presenting some of the information you have captured at the beginning of the workflow: the business term name and definition and the name of the user who created the asset. You allow the subject matter expert to onboard or send back the business term and to change the name or the definition if needed.
- Once again, you create a process variable to capture the current user so you can assign the next subject matter expert user task to the same person.
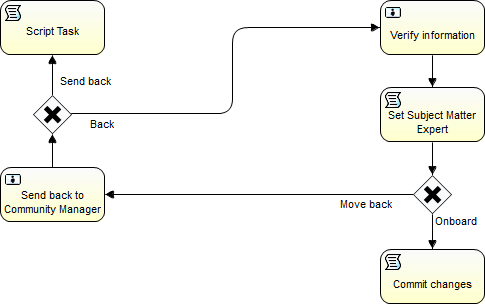
- In case the subject matter expert sends back the business term needs to be sent back, you ask the same subject matter expert who took this decision to provide a comment for the community manager. You also provide the option to go back to the verification user task.
- You create a script task to assign the subject matter expert comment to the empty process variable you have created at the beginning of the workflow and to move the business term back to the original domain that you have also stored in a process variable.
- When the subject matter expert onboards the business term, you determine if there are any changes by comparing the initial name and definition values to the input from the expert and apply them to the business term with a final script task.
Skills
As you complete this tutorial you will become more familiar with:
- Workflow process variables.
- User task forms.
- Displaying dynamic content with variables.
- Groovy script tasks and the Collibra Java API.
- Writing entries in the Collibra Platform logs.
- Exclusive gateways.
Prerequisites
- Eclipse IDE.
- Flowable Eclipse Designer plugin.
- Access to a Collibra environment as a user with the Sysadmin global role or a global role that has at least the Workflow Administration global permission.
- Access to the Collibra Console for troubleshooting.
For more installation details and to get familiar with the Eclipse IDE interface, see Getting Started with workflows.
Create the workflow
Open Eclipse IDE and create a new Flowable project and diagram:
- Use Business Term Onboarding for the project name.
- Use BusinessTermOnboarding.bpmn for the diagram name.
For more information on how to create a Flowable project and diagram, see the Getting started with workflows and the Hello World! tutorials.
Add a pool and lanes
- Add a pool and configure the pool properties:
- General:
- Id: BusinessTermOnboardingPool
- Name: Business Term Onboarding
- Process:
- Id: BusinessTermOnboarding
The process ID must be unique at the Collibra environment level.
Uploading a workflow definition with the same process ID as an existing workflow definition in Collibra replaces the existing workflow definition.
- Name: Business Term Onboarding
The name is displayed as the workflow name in Collibra.
Collibra does not accept two workflows with the same name.
- Namespace: http://www.collibra.com/apiv2
By referencing version 2 of the Collibra Java API, the workflow is validated against V2 methods and deprecated V1 methods trigger a method does not exist error when called.
- Documentation: The contents of the field become the description of the workflow in Collibra.
- Id: BusinessTermOnboarding
- General:
- Configure the lane properties:
- Id: CommunityManagerLane
- Name: Community Manager
- From the Containter section of the Palette, drag a second Lane to the pool and configure the lane properties:
- Id: SubjectMatterExpertLane
- Name: Subject Matter Expert
Add and configure the start event
- From the Start event section of the Palette, drag a StartEvent to the Community Manager lane.
- In the Properties view, select the Form section.
The start event form variables set values that are used throughout the workflow. You can change these variables from the worfklow definition page in Collibra Platform.
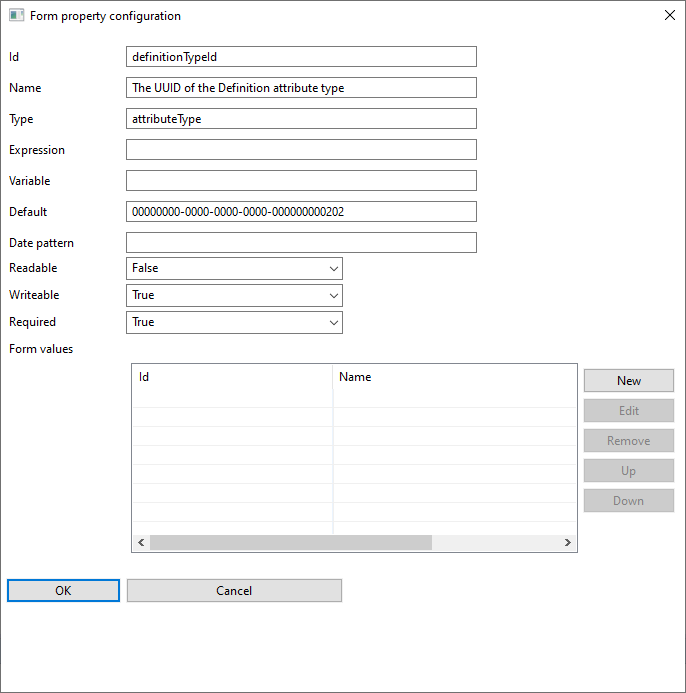
- Add a variable to set the UUID of the Definition attribute type:
- Click New.
- Enter the required information:
- Id: definitionTypeId
- Name: The UUID of the Definition attribute type
- Type: attributeType
- Default: 00000000-0000-0000-0000-000000000202
- Readable: False
- Writeable: True
- Required: True
- Add a variable to set the UUID of the Invalid status:
- Click New.
- Enter the required information:
- Id: invalidStatusIdString
- Name: The UUID of the Invalid status
- Type: string
- Default: 00000000-0000-0000-0000-000000005022
- Readable: False
- Writeable: True
- Required: True
- Add a variable to set the UUID of the Candidate status:
- Click New.
- Enter the required information:
- Id: candidateStatusIdString
- Name: The UUID of the Candidate status
- Type: string
- Default: 00000000-0000-0000-0000-000000005008
- Readable: False
- Writeable: True
- Required: True
- Add a variable to set the user expression for the Community Manager role:
- Click New.
- Enter the required information:
- Id: userExpression_CommunityManager
- Name: The candidate user expression for the Community Manager role
- Type: string
- Default: role(Community Manager)
- Readable: False
- Writeable: True
- Required: True
- Add a variable to set the user expression for the Subject Matter Expert role:
- Click New.
- Enter the required information:
- Id: userExpression_SME
- Name: The candidate user expression for the Subject Matter Expert role
- Type: string
- Default: role(Subject Matter Expert)
- Readable: False
- Writeable: True
- Required: True
Create a script task to process the required UUIDs
The script processes the universally unique identifiers (UUIDs) and sets other variables required by the workflow such as the business term name and definition, the name of the user who created the asset. It also changes the status of the business term to candidate and makes the results available in the Collibra logs.
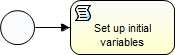
- From the Task section of the Palette, drag a ScriptTask to the Community Manager lane.
- In the General section, enter a Name: Set up initial variables.
- In the Main config section:
- Select the groovy script language.
- Add the script to set up the initial variables:
import com.collibra.dgc.core.api.model.instance.Asset
import com.collibra.dgc.core.api.dto.instance.asset.ChangeAssetRequest
import com.collibra.dgc.core.api.model.user.User
import com.collibra.dgc.core.api.dto.instance.attribute.FindAttributesRequest
import com.collibra.dgc.core.api.model.instance.attribute.Attribute
import com.collibra.dgc.core.api.model.instance.Domain

Asset currentAsset = assetApi.getAsset(item.getId())

loggerApi.info(">>>> [Onboarding of " + currentAsset.getDisplayName() + "] Setup initial variables")

// Retrieve initial asset values
// - Asset name
String assetName = currentAsset.getDisplayName();

// - Asset definition
FindAttributesRequest findDefinition = FindAttributesRequest.builder().assetId(currentAsset.getId()).typeIds([definitionTypeId]).build()
List<Attribute> proposedDefinitions = attributeApi.findAttributes(findDefinition).getResults()
Attribute initialDefinition = proposedDefinitions.get(0);

// - Asset domain
UUID initialDomainId = currentAsset.getDomain().getId()

// Set status to candidate
UUID candidateStatusId = UUID.fromString(candidateStatusIdString);
ChangeAssetRequest changeAssetRequest = ChangeAssetRequest.builder().id(currentAsset.getId()).statusId(candidateStatusId).build()
assetApi.changeAsset(changeAssetRequest)

User submitter = userApi.getUser(currentAsset.getCreatedBy())

execution.setVariable('currentAsset', currentAsset)
execution.setVariable('submitter', submitter)
execution.setVariable('initialDisplayName', assetName)
execution.setVariable('initialDefinition', initialDefinition)
execution.setVariable('initialDomainId', initialDomainId)
execution.setVariable('commentToCommunityManager', "")
- Connect the start event to the script task with a SequenceFlow connection.
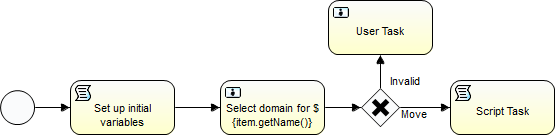
Create a user task to select a domain
The user task asks a community manager to establish if the business term needs to be onboarded or not and what domain the asset needs to be moved to.
- From the Task section of the Palette drag a UserTask to the Community Manager lane.
- Connect the variables setup script task to the user task with a SequenceFlow connection.
- Select the user task.
- In the Properties view, select the General section and enter the Name: Select domain for ${currentAsset.getDisplayName()}.
Use the currentAsset variable to dynamically retrieve the name of the asset the workflow has been started for.
- In the Properties view, select the Main Config section and enter the Candidate user:
${userExpression_CommunityManager}.This assigns the task to the users that have a Community Manager role for the current asset.
- In the Properties view, select the Documentation section and enter the instructions for the community manager:
Select the appropriate <b>domain</b> for <b><i>${currentAsset.getDisplayName()}</i></b>.<br /> The asset will be sent for review to the Subject Matter Expert of the selected domain.<br /> <br /> Click <b>Invalid</b> if the asset does not require onboarding. <div style="font-weight:normal">${commentToCommunityManager.toString()}</div> - In the Properties view, select the Form section and add the following elements to the dialog box:
-
A drop-down list of available domains:
- Id: domain
- Name: Domain
- Type: domain
- Readable: True
- Writeable: True
- Required: False
-
A button to mark the asset as invalid:
- Id: invalidButton
- Name: Invalid
- Type: button
- Readable: True
- Writeable: True
- Required: False
-
A button to move the asset to the selected domain:
- Id: moveButton
- Name: Move to domain
- Type: button
- Readable: True
- Writeable: True
- Required: False
-
A drop-down list of available domains:

Create a script task to capture the current user
The script task captures the current user and assigns the user name to a process variable that you can later use to assign a subsequent user task to the same user.
- From the Task section of the Palette drag a ScriptTask to the Community Manager lane after the domain selection user task.
- In the General section, enter a Name: Set Community Manager.
- In the Main config section:
- Select the groovy script language.
- Add the script to set the Community Manager variable:
execution.setVariable('communityManager', users.getCurrent())
- Connect the domain selection user task to the script task with a SequenceFlow connection.

Route the workflowbased on whether to onboard or not the business term
Based on the community manager's decision, the workflow moves the business term to the selected domain or asks the community manager to provide a reason for not onboarding the asset.
- From the Gateway section of the Palette, drag an ExclusiveGateway to the Community Manager lane after the community manager script task.
- Connect the script task to the exclusive gateway with a SequenceFlow connection.
- From the Task section of the Palette, drag a UserTask to the Community Manager lane above the exclusive gateway.
- Connect the exclusive gateway to the user task with a SequenceFlow connection.
- Select the sequence flow.
- In the Properties view, select the General section and enter a Name: Invalid.
- In the Properties view, select the Main config tab and enter the Condition:
${invalidButton}.The workflow takes this path when the invalidButton from the domain selection user task is clicked.
- From the Task section of the Palette drag a ScriptTask to the Community Manager lane after the exclusive gateway.
- Connect the exclusive gateway to the script task with a SequenceFlow connection.
- Select the sequence flow.
- In the Properties view, select the General section and enter a Name: Move
- In the Properties view, select the Main config tab and enter the Condition:
${moveButton}.The workflow takes this path when the community manager clicks the moveButton from the domain selection user task.
Configure the move script task
The script task moves the business term to the selected domain.
- Select the script task after the exclusive gateway.
- In the General section, enter a Name: Move asset to domain.
- In the Main config section:
- Select the groovy script language.
- Add the script to move the asset to the selected domain:
import com.collibra.dgc.core.api.dto.instance.asset.ChangeAssetRequest

loggerApi.info(">>>> [Onboarding of " + currentAsset.getDisplayName() + "] Move asset to domain")

ChangeAssetRequest changeAssetRequest = ChangeAssetRequest.builder().id(item.getId()).domainId(domain).build()
assetApi.changeAsset(changeAssetRequest)

loggerApi.info(">>>> Asset moved")
Configure the invalid user task
When the community manager does not onboard the business term, they provide a reason for changing the status of the business term to invalid.
- Select the user task above the exclusive gateway.
- In the Properties view, select the General section and enter the Name: Reason to invalidate ${currentAsset.getDisplayName()}.
- In the Properties view, select the Main Config section and enter the Candidate user:
user(${communityManager}).This assigns the task to the same Community Manager that performed the initial evaluation.
- In the Properties view, select the Documentation section and enter the instructions for the Community Manager:
What are the reasons to mark ${currentAsset.getDisplayName()} invalid?<br /> Your comment will be saved on the asset and its status will be changed to Invalid. - In the Properties view, select the Form section and add the following elements to the dialog box:
-
A text area to capture the reason:
- Id: invalidateComment
- Name: Comment:
- Type: textarea
- Readable: True
- Writeable: True
- Required: False
-
A button to mark the asset as invalid:
- Id: invalidateButton
- Name: Invalidate
- Type: button
- Readable: True
- Writeable: True
- Required: False
-
A button to go back to the domain selection user task:
- Id: backButton
- Name: Back
- Type: button
- Readable: True
- Writeable: True
- Required: False
The domain selection user task will be presented to all users that have the Community Manager role for the business term.
-
A text area to capture the reason:
Route the workflow based on whether to invalidate or not the business term
Based on the community manager's decision, the workflow changes the status of the business term to invalid or goes back to the domain selection user task.
- From the Gateway section of the Palette, drag an ExclusiveGateway to the Community Manager lane above the invalid user task.
- Connect the user task to the exclusive gateway with a SequenceFlow connection.
- From the Task section of the Palette drag a ScriptTask to the Community Manager lane after the exclusive gateway.
- Connect the exclusive gateway to the user task with a SequenceFlow connection.
- Select the sequence flow.
- In the Properties view, select the General section and enter a Name: Invalid.
- In the Properties view, select the Main config tab and enter the Condition:
${invalidateButton}. - Connect the exclusive gateway to the domain selection user task with a SequenceFlow connection.
- Select the sequence flow.
- In the Properties view, select the General section and enter a Name: Back
- In the Properties view, select the Main config tab and enter the Condition:
${backButton}.
Configure the script task to mark the business term invalid
The script changes the status of the business term to invalid, as defined by the start form process variable, and adds the reason the community manager provided as a comment on the asset page.
- Select the script task after the exclusive gateway.
- In the General section, enter a Name: Mark asset as invalid.
- In the Main config section:
- Select the groovy script language.
- Add the script to mark the asset as invalid and to add the reason as a comment:
import com.collibra.dgc.core.api.dto.instance.asset.ChangeAssetRequest
import com.collibra.dgc.core.api.dto.instance.comment.AddCommentRequest
import com.collibra.dgc.core.api.model.ResourceType

loggerApi.info(">>>> [Onboarding of " + currentAsset.getDisplayName() + "] Mark asset as invalid")

UUID invalidStatusId = UUID.fromString(invalidStatusIdString);

ChangeAssetRequest changeAssetRequest = ChangeAssetRequest.builder().id(currentAsset.getId()).statusId(invalidStatusId).build()
assetApi.changeAsset(changeAssetRequest)

if (invalidateComment.toString().length() > 0) {
    AddCommentRequest addCommentRequest = AddCommentRequest.builder().baseResourceId(currentAsset.getId()).baseResourceType(ResourceType.Asset).content(invalidateComment.toString()).build()
    commentApi.addComment(addCommentRequest)
}
- Connect the exclusive gateway to the script task with a SequenceFlow connection.
- From the End event section of the Palette, drag an EndEvent to the Community Manager lane.
- Connect the script task to the end event with a SequenceFlow connection.
Create a user task to onboard the asset
The user task asks a subject matter expert to verify if the business term belongs to the domain it has been moved to.
- From the Task section of the Palette drag a UserTask to the Subject Matter Expert lane beneath the move script task form the Community Manager lane.
- Connect the move script task to the user task with a SequenceFlow connection.
- Select the user task.
- In the Properties view, select the General section and enter the Name: Verify information.
- In the Properties view, select the Main Config section and enter the Candidate user:
${userExpression_SME}.This assigns the task to the users that have a Subject Matter Expert role for the current domain.
- In the Properties view, select the Documentation section and enter the instructions for the Subject Matter Expert:
Check the information submitted by ${submitter.getFirstName()} ${submitter.getLastName()}.<br /> Update the name or definition if required and clik <b>Onboard</b>.<br /> Click <b>Move back</b> if this is not the correct domain for the business term. - In the Properties view, select the Form section and add the following elements to the dialog box:
- The name of the asset:
- Id: newName
- Name: Proposed name
- Type: string
- Default: ${currentAsset.getDisplayName()}
- Readable: True
- Writeable: True
- Required: False
-
The definition of the asset:
- Id: newDefinition
- Name: Proposed definition
- Type: textarea
- Default: ${initialDefinition.getValue()}
- Readable: True
- Writeable: True
- Required: False
-
A button to onboard the asset:
- Id: onboardButton
- Name: Onboard
- Type: button
- Readable: True
- Writeable: True
- Required: False
-
A button to send back the asset:
- Id: moveBackButton
- Name: Move back
- Type: button
- Readable: True
- Writeable: True
- Required: False
- The name of the asset:

Create a script task to capture the current user
The script task captures the current user and assigns the user name to a process variable that you can later use to assign a subsequent user task to the same user.
- From the Task section of the Palette drag a ScriptTask to the Subject Matter Expert lane beneath the onboarding user task.
- In the General section, enter a Name: Set Subject Matter Expert.
- In the Main config section:
- Select the groovy script language.
- Add the script to set the Subject Matter Expert variable:
execution.setVariable('subjectMatterExpert', users.getCurrent())
- Connect the onboarding user task to the script task with a SequenceFlow connection.
Route the workflow based on whether to onboard or not the business term
Based on the subject matter expert's decision, the workflow changes the business term name and definition or asks the subject matter expert to provide a reason for not onboarding the business term.
- From the Gateway section of the Palette, drag an ExclusiveGateway to the Subject Matter Expert lane beneath the subject matter expert script task.
- Connect the script task to the exclusive gateway with a SequenceFlow connection.
- From the Task section of the Palette, drag a UserTask to the Subject Matter Expert lane to the left of the exclusive gateway.
- Connect the exclusive gateway to the user task with a SequenceFlow connection.
- Select the sequence flow.
- In the Properties view, select the General section and enter a Name: Move back.
- In the Properties view, select the Main config tab and enter the Condition:
${moveBackButton}. - From the Task section of the Palette, drag a ScriptTask to the Subject Matter Expert lane beneath the exclusive gateway.
- Connect the exclusive gateway to the script task with a SequenceFlow connection.
- Select the sequence flow.
- In the Properties view, select the General section and enter a Name: Onboard
- In the Properties view, select the Main config tab and enter the Condition:
${onboardButton}.
Configure the onboarding script task
The script applies any changes the subject matter expert might have made to the business term.
- Select the script task beneath the exclusive gateway.
- In the General section, enter a Name: Commit changes.
- In the Main config section:
- Select the groovy script language.
- Add the script to apply the Subject Matter Expert changes:
import com.collibra.dgc.core.api.dto.instance.attribute.ChangeAttributeRequest
import com.collibra.dgc.core.api.dto.instance.asset.ChangeAssetRequest

loggerApi.info(">>>> [Onboarding of " + currentAsset.getDisplayName() + "] Commit changes")

if (currentAsset.getDisplayName() != newName) {
    ChangeAssetRequest changeAssetRequest = ChangeAssetRequest.builder().id(currentAsset.getId()).displayName(newName).build()
    assetApi.changeAsset(changeAssetRequest)
}

if (initialDefinition.getValue() != newDefinition) {
    ChangeAttributeRequest changeAttributeRequest = ChangeAttributeRequest.builder().id(initialDefinition.getId()).value(newDefinition.toString()).build()
    attributeApi.changeAttribute(changeAttributeRequest)
}
- From the End event section of the Palette, drag an EndEvent to the Subject Matter Expert lane.
- Connect the script task to the end event with a SequenceFlow connection.

Configure the move back user task
When the subject matter expert does not onboard the business term, they provide a comment to help the community managers determine the correct domain for the business term.
- Select the user task to the left of the exclusive gateway.
- In the Properties view, select the General section and enter the Name: Send back to Community Manager.
- In the Properties view, select the Main Config section and enter the Candidate user:
user(${subjectMatterExpert}).This assigns the task to the same Subject Matter Expert that performed the initial verification.
- In the Properties view, select the Documentation section and enter the instructions for the Community Manager:
Why is this not the right domain for this asset?<br /> Your comment will help the Community Manager pick the correct domain for this asset. - In the Properties view, select the Form section and add the following elements to the dialog box:
-
A text area to capture the comment:
- Id: commentToCommunityManagerForm
- Name: Comment:
- Type: textarea
- Readable: True
- Writeable: True
- Required: False
-
A button to move back the asset:
- Id: sendBackToCM
- Name: Send back
- Type: button
- Readable: True
- Writeable: True
- Required: False
-
A button to go back to the onboarding user task:
- Id: backButton
- Name: Back
- Type: button
- Readable: True
- Writeable: True
- Required: False
The onboarding user task will be presented to all users that have the Subject Matter Expert role for the selected domain.
-
A text area to capture the comment:
Route the workflow based on whether to send back or not the business term
Based on the subject matter expert's decision, the workflow moves the business term to the original domain, notifies the community managers and continues the onboarding process with the domain selection task or goes back to the verification user task.
- From the Gateway section of the Palette, drag an ExclusiveGateway to the Subject Matter Expert lane above the move back user task.
- Connect the user task to the exclusive gateway with a SequenceFlow connection.
- From the Task section of the Palette, drag a ScriptTask to the Subject Matter Expert lane above the exclusive gateway.
- Connect the exclusive gateway to the user task with a SequenceFlow connection.
- Select the sequence flow.
- In the Properties view, select the General section and enter a Name: Send back.
- In the Properties view, select the Main config tab and enter the Condition:
${sendBackToCM}. - Connect the exclusive gateway to the onboarding user task with a SequenceFlow connection.
- Select the sequence flow.
- In the Properties view, select the General section and enter a Name: Back
- In the Properties view, select the Main config tab and enter the Condition:
${backButton}.
Configure the script task to move the business term to the original domain
The script moves the business term back to the original domain. It also captures the subject matter expert's comment for use in the domain selection user task.
- Select the script task above the exclusive gateway.
- In the General section, enter a Name: Move asset to original domain.
- In the Main config section:
- Select the groovy script language.
- Add the script to move the asset back to the original domain:
import com.collibra.dgc.core.api.dto.instance.asset.ChangeAssetRequest

loggerApi.info(">>>> [Onboarding of " + currentAsset.getDisplayName() + "] Move asset back to Community Manager")

def commentToDisplay = "<p>Comment from SME:</p><p>" + commentToCommunityManagerForm + "</p>"

execution.setVariable('commentToCommunityManager', commentToDisplay)

ChangeAssetRequest changeAssetRequest = ChangeAssetRequest.builder().id(item.getId()).domainId(initialDomainId).build()
assetApi.changeAsset(changeAssetRequest)

loggerApi.info(">>>> Asset moved")
- Connect the exclusive gateway to the script task with a SequenceFlow connection.
- Connect the script task to the domain selection user task of the Community Manager lane with a SequenceFlow connection.
Save your work.
Deploy your workflow
- Sign in to Collibra as a user with the Sysadmin global role or a global role that has at least the Workflow Administration global permission.
-
On the main toolbar, click
 →
→
 Settings.
The Collibra settings page opens. - Click Workflows.
The Workflows settings page appears on the Definitions tab page. - Click
 Upload a file and locate the BPMN file you have just created inside the Eclipse workspace folder.
With the BPMN file selected in Eclipse, select Navigate → Show In → System Explorer. An explorer window will open, showing the exact file location. You can now drag and drop the file to the Upload a file section in your browser.
A progress bar displays the upload progress.
Once the file is uploaded, you see your workflow in the Workflows Definitions table.
For more details, see the Deploy a workflow section of the Collibra Platform Administration Guide.
Workflow configuration settings
To fine tune the workflow you must change the default configuration in Collibra Platform:
-
On the main toolbar, click
→
Settings.
The Collibra settings page opens. - Click Workflows.
The Workflows settings page appears on the Definitions tab page. - Select the Business Term Onboarding workflow.
Restrict the workflow to the business term asset type.
- On the workflow definition page, change the Applies To to Asset.
- In the Applies To section, click Add.
- In the restriction rules dialog box, search for:
- Type: Business Term.
- Domain: New Bunisess Terms.
- Click Save.

Allow only community managers to start the workflow
- On the workflow definition page, in the Roles section, click
 .
. - Under Start Workflow, search for Community Manager.
- Click Save.
Disable the candidate user check
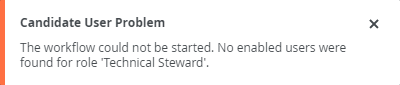
To prevent the candidate user check from stopping the workflow when there are no subject matter experts assigned to the business term, disable this option.
- On the workflow definition page, in the Other section, clear the Perform candidate user check on workflow start option.
A subject matter expert must be assigned to the target domain for the workflow to successfully complete.
Troubleshooting
In case of errors, the workflow does not start, and an error message is displayed.
The logs contain more information about the error:
- Open Collibra Console.
Collibra Console opens with the Infrastructure page. - Click the name of the environment you deployed the workflow in to display its details.
- Select Data Governance Center.
- Select Logs → dgc.log
Look for errors related to Java or Groovy.
Next steps
You have created a workflow that helps you onboard new business terms by having a community manager assign the business term to a new domain, where a subject matter expert verifies if the business term belongs there or not.
This scenario was part of the interactive Data Citizens - Under the Hood technical day 2018. To get the full Under the Hood experience, look for the next session and the next Data Citizens conference.
Additional resources
- Read the Getting started with workflows Collibra Administration Guide section.
- Read the Using workflows Collibra User Guide section.
- Consult the java documentation: https://<your_collibra_url>/docs/javav2/index.html.