Workflow basic configuration elements
Workflows created with the Flowable Designer can be published immediately. You can run and use the workflows without further customizations.
However, to be able to leverage the full potential of workflows in Collibra Platform, you need to know some basic elements.
For an extensive manual about using Flowable, see the Flowable documentation.
Model keys
Model keys are unique identifiers for processes and forms in Workflow Designer workspaces. The process key also identifies workflows in Collibra and must be unique in your environment.
If you change the process key of a workflow and publish it again, it is considered as a completely new workflow and Collibra creates a different workflow definition for it.
If you publish a workflow with the same key as the key or the process ID of an already existing one, a new version of the same workflow is created. All running workflow instances keep running with the old version. All workflows started after publishing use the new version. The settings on the workflow definition remain the same and include any newly added configuration variables.
When you create new processes or forms, you must provide a key and one is automatically generated from the name of the model.
You can change the process key of a workflow:
- In the workflow BPMN:
<process id="approvalProcess" ... - In the Workflow Designer:
- Select your app.
- For the process model, select
 → Update model key.
The Update model key dialog box appears.
- Change the model key.
- Click Save to save your changes and close the dialog box.
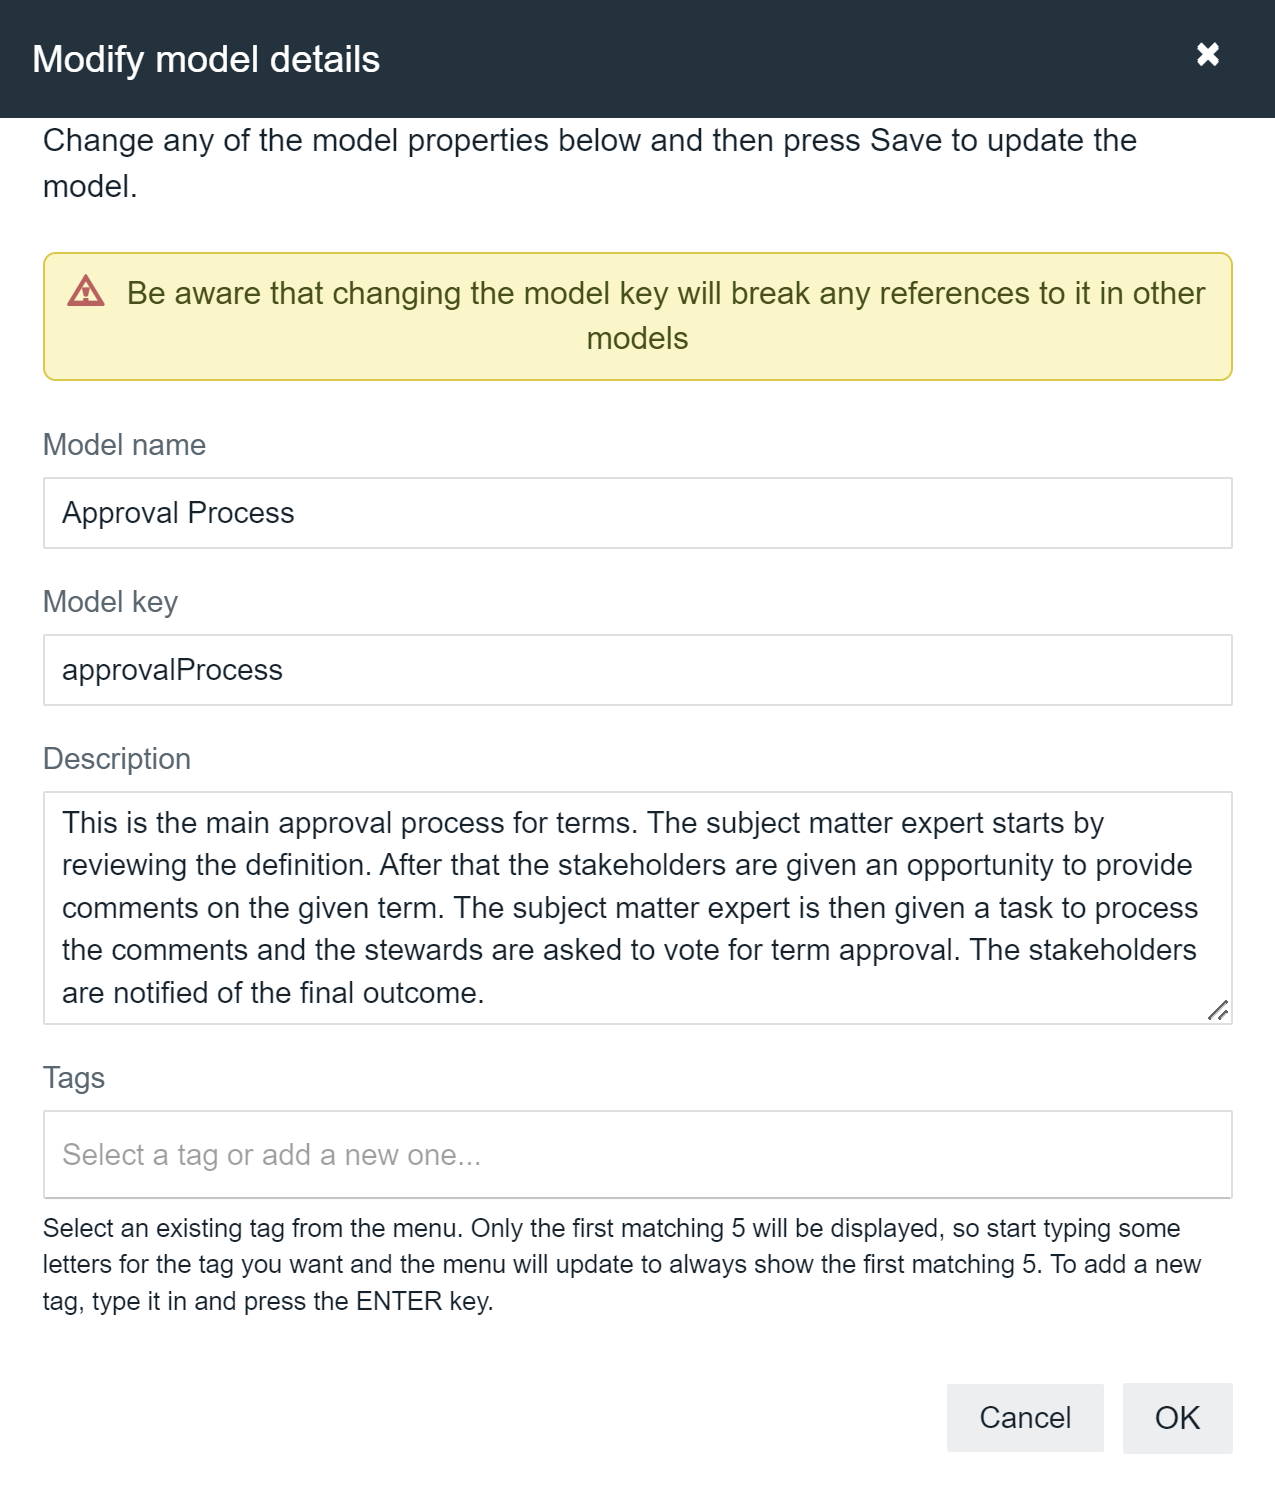
Model keys cannot include special characters.
Workflow description
The workflow description provides details about the purpose and general usage of a workflow.
You can add a description when creating new process models.
You can change the description of a workflow:
- Select your app.
- Select the process model.
The process editor appears.
- In the attribute bar, in the General section, select the Documentation attribute.
- Enter the workflow description.
- Save your changes.
-
On the main toolbar, click
 →
→
 Settings.
The Settings page opens. - Click Workflows.
The Workflows settings page appears on the Definitions tab page. - Select a workflow to view the definition settings.
- In the Description section, click Edit to edit the description.
- Click Save to apply your changes.
Uploading a workflow with a modified description also updates this field.
Edit the <documentation> tag:
<process id="approvalProcess" name="Approval Process" isExecutable="true">
  <documentation>
    This is the main approval process for terms.
    The subject matter expert starts by reviewing the definition.
    After that the stakeholders are given an opportunity to provide
    comments on the given term. The subject matter expert is then given a
    task to process the comments and the stewards are asked to vote for
    term approval. The stakeholders are notified of the final outcome.
  </documentation>....
Process variables
Variables play a critical role in workflows by dynamically storing and passing data. This enables workflows to adapt to user input, system states, or external data.
Variables act as placeholders for data that you can dynamically assign, modify, or retrieve during the execution of a workflow. They allow workflows to respond to specific conditions, user inputs, or system states, making workflows more flexible and interactive.
For example, a variable can store:
- User input from a form, such as a due date entered by a user.
- Dynamic data retrieved from Collibra assets, such as the name of an asset.
- System-generated values, such as timestamps or IDs.
Setting process variables
Process variables originate from various sources:
- The start event initiator: The value you provide as the Initiator variable of the start event becomes one of the first variables, defining the user who starts the workflow. By default, the value is initiator and user tasks are automatically assigned to this candidate through the expression
user(${initiator}). - User task form fields: In user tasks, any data entry or selection component that a user interacts with becomes a process variable. You use the Value property of the component to reference this variable.
- Script task variables:
- The scope of the variables you declare in a script task is limited to that script. However, you can set process variables, which become available outside the script, using
execution.setVariable(<variable_name>, <varaible_value>);, where <variable_name> is a String and <variable_value> is an object. - Workflow beans: Built-in context variables that provide information about the context in which the workflow is running, such as
users.currentoritem.type. API interfaces: Interfaces such as AssetApi, UserApi, and FileApi are pre-instantiated and accessible via variables such as
assetApi,userApi, andfileApi.
- The scope of the variables you declare in a script task is limited to that script. However, you can set process variables, which become available outside the script, using
- Configuration variables: When you publish a workflow, Collibra automatically adds a series of default configuration variables for each user task. These include duration variables for the due dates and escalation durations, in addition to any configuration variables you might have set.
Reserved variable names
When working with variables in workflows, it is important to be aware of reserved variable names. These are predefined variables that Collibra uses, and they cannot be overridden or redefined in your workflows. Using these reserved names for custom variables can lead to unexpected behavior or errors:
escalationTypeeventeventResourceIdeventResourceTypeeventTaskCandidateseventTaskIdeventTaskKeyeventTypeeventV1eventV2initiatorisApiV2WorkflowitemitemCommunityitemResourceIditemResourceTypeitemV1itemV2itemVocabularymailusersusersV1usersV2workflowDefinitionNameworkflowStartUserId
Retrieving process variables
You can retrieve process variables in several ways, depending on where this action occurs:
- In script tasks: You have direct access to all process variables. You can also explicitly retrieve a variable with
execution.getVariable(<variable_name>);, where <variable_name> is a String. - In other process components: Use JUEL expressions to access variables, such as
${myVariable}. - In form components: Unless otherwise noted, retrieve the value of a variable by including the variable name in a form expression:
{{}}, for example{{initiator}}.
Exchanging process variables with a sub-process
Sub-processes are workflows that run as part of a parent workflow. They are not designed to be stand-alone workflows. You must provide values for start form variables with the Required property set to true. Additionally, you may use sub-process variables in the parent workflow.
To exchange information between a parent workflow and a sub-process, configure the call activity in the parent workflow:
- In the In section of the Variable Mapping properties, add items and:
- Enter parent workflow process variables in the Source variable field.
- Enter the corresponding sub-process variables in the Target variable field.
- Use an expression in the Source Expression field if to pass a hard-coded value, for example
${"Enter a brief description"}or${false}.
- In the Out section of the Variable Mapping properties, add items and:
- Enter sub-process variables in the Source variable field.
- Enter the corresponding parent workflow process variables in the Target variable field.
Since the parent workflow and the sub-process are separate workflows, you can use the same name for corresponding variables.
Important considerations
By understanding and leveraging variables effectively, you can create dynamic and responsive workflows in Collibra that cater to a wide range of business needs.
To maximize the potential of variables, consider the following:
- Descriptive naming: Use clear and meaningful names, such as requestorName instead of rn.
- Consistent naming conventions: Follow consistent patterns, for example camel case: usageRequestReason.
- Scope and data type awareness: Understand where variables are accessible and their data types.
- Variable validation: Implement validation where necessary to ensure data integrity.
Workflow dialog boxes
The most common scenario for dialog boxes is when you need to provide data in a workflow start form before the workflow starts.
Start forms
When the start event of your workflow has a form reference, a dialog box appears before the start of the workflow. You must fill in the required information or accept the default values and submit them to start the workflow. If you close the dialog box instead of submitting the form, the workflow does not start. If you do not provide the required information and continue, the workflow starts but might not complete.
If you start a workflow from another workflow or via the API, you must provide the required information for the start forms with your request to start the workflow. In these cases, the workflow cannot generate a dialog box to request the information.
User tasks
There are some scenarios where the dialog boxes appear automatically for user tasks. These happen when the next available user task is assigned to the same user who has just:
- Completed a start form.
- Started a global workflow without a start form.
- Completed another user task in a dialog box.
For these scenarios to work, all of the following conditions must be met:
- You either start the workflow on the resource page for which the workflow is configured, or you use a global workflow.
- Any script tasks that are between the start form and the next available task or between a task in a dialog box and the next available task are completed.
- You do not close the first dialog box before the second one appears.
- The start form or user task in a dialog box and the next available task belong to the same workflow process and neither is part of a sub-process.