> For the complete documentation index, see [llms.txt](https://developer.collibra.com/llms.txt). Markdown versions of documentation pages are available by appending `.md` to page URLs; this page is available as [Markdown](https://developer.collibra.com/tutorials/soft-delete-workflow.md).
# Soft delete workflow
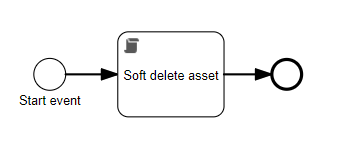
In this tutorial you create a workflow that helps you change the status of an asset to **Missing from source** instead of permanently deleting it.
 ## Prerequisites
* Access to the Workflow Designer for designing the workflow.
* Access to a Collibra environment as a user with the Sysadmin global role or a global role that has at least the Workflow Administration global permission for configuring the workflow.
* Optionally, access to the Collibra Console for troubleshooting.
{% hint style="success" %}
For details about the Workflow Designer, see the [Workflow Designer documentation](/workflows/workflows-at-collibra.md).
{% endhint %}
## Create a new app for your workflow
Access the Workflow Designer and create a new app:
{% stepper %}
{% step %}
In the navigation bar, select **Apps**.
{% endstep %}
{% step %}
In the top left corner of the **Apps** tab, click **✚ Create app**.
{% endstep %}
{% step %}
Enter the required information:
* **App name**: *Soft delete asset workflow*
* **App key**: The app key is automatically generated based on the App name value.
* **Description**: Although optional, the descriptions allow you to see an overview of the workflow purpose, for example *This workflow allows you to soft delete assets by changing the status of the selected asset to "Missing from resource" instead of completely removing the asset from Collibra.*
{% endstep %}
{% step %}
Click **Create new app**.
{% endstep %}
{% endstepper %}
:chevrons-right: Your newly created app appears in the **App models list** on the **Apps** tab and you are redirected to the app editor page.
## Create a new process for your app
{% stepper %}
{% step %}
In the app editor page, click **✚ Add model**.
{% endstep %}
{% step %}
In the **What would you like to do?** dialog box, select **Create a new model for the app** → **Process**.
{% endstep %}
{% step %}
Enter the required information:
* **Model name**: *Delete asset*
* **Model key**: The model key is automatically generated based on the Model name value.
* **Description**: Although optional, the descriptions allow you to provide an overview of the workflow purpose.
{% endstep %}
{% step %}
Click **Create new model**.
{% endstep %}
{% endstepper %}
:chevrons-right: Your newly created process appears in the app editor and you are redirected to the process editor page.
## Edit the process of your workflow
{% stepper %}
{% step %}
In the app editor, select your process.\ :chevrons-right: The process editor opens.
{% hint style="info" %}
Your process already contains a start event.
{% endhint %}
{% endstep %}
{% step %}
From the **Shape repository**, drag a **Script task** to the canvas and place it to the right of the start event.
## Prerequisites
* Access to the Workflow Designer for designing the workflow.
* Access to a Collibra environment as a user with the Sysadmin global role or a global role that has at least the Workflow Administration global permission for configuring the workflow.
* Optionally, access to the Collibra Console for troubleshooting.
{% hint style="success" %}
For details about the Workflow Designer, see the [Workflow Designer documentation](/workflows/workflows-at-collibra.md).
{% endhint %}
## Create a new app for your workflow
Access the Workflow Designer and create a new app:
{% stepper %}
{% step %}
In the navigation bar, select **Apps**.
{% endstep %}
{% step %}
In the top left corner of the **Apps** tab, click **✚ Create app**.
{% endstep %}
{% step %}
Enter the required information:
* **App name**: *Soft delete asset workflow*
* **App key**: The app key is automatically generated based on the App name value.
* **Description**: Although optional, the descriptions allow you to see an overview of the workflow purpose, for example *This workflow allows you to soft delete assets by changing the status of the selected asset to "Missing from resource" instead of completely removing the asset from Collibra.*
{% endstep %}
{% step %}
Click **Create new app**.
{% endstep %}
{% endstepper %}
:chevrons-right: Your newly created app appears in the **App models list** on the **Apps** tab and you are redirected to the app editor page.
## Create a new process for your app
{% stepper %}
{% step %}
In the app editor page, click **✚ Add model**.
{% endstep %}
{% step %}
In the **What would you like to do?** dialog box, select **Create a new model for the app** → **Process**.
{% endstep %}
{% step %}
Enter the required information:
* **Model name**: *Delete asset*
* **Model key**: The model key is automatically generated based on the Model name value.
* **Description**: Although optional, the descriptions allow you to provide an overview of the workflow purpose.
{% endstep %}
{% step %}
Click **Create new model**.
{% endstep %}
{% endstepper %}
:chevrons-right: Your newly created process appears in the app editor and you are redirected to the process editor page.
## Edit the process of your workflow
{% stepper %}
{% step %}
In the app editor, select your process.\ :chevrons-right: The process editor opens.
{% hint style="info" %}
Your process already contains a start event.
{% endhint %}
{% endstep %}
{% step %}
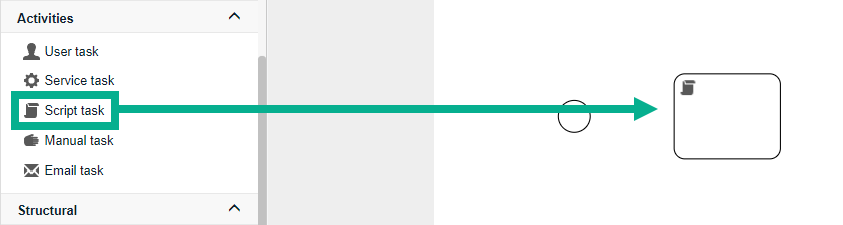
From the **Shape repository**, drag a **Script task** to the canvas and place it to the right of the start event.
 {% endstep %}
{% step %}
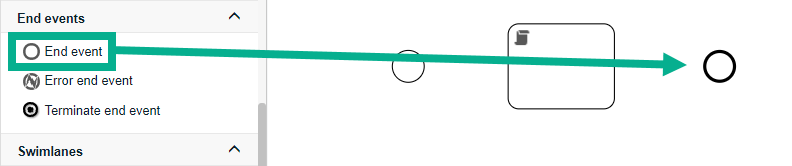
From the **Shape repository**, drag an **End event** to the canvas and place it to the right of the script task.
{% endstep %}
{% step %}
From the **Shape repository**, drag an **End event** to the canvas and place it to the right of the script task.
 {% endstep %}
{% step %}
Click the start event and then drag and drop a **Sequence flow** over the script task.
{% endstep %}
{% step %}
Click the script tasks and then drag and drop a **Sequence flow** over the end event.
{% endstep %}
{% step %}
Click the start event and then drag and drop a **Sequence flow** over the script task.
{% endstep %}
{% step %}
Click the script tasks and then drag and drop a **Sequence flow** over the end event.
 {% endstep %}
{% endstepper %}
### Add a form property to your start event
You use a form property in the start event to define the [process variable](/workflows/creating-workflows/workflow-basic-configuration-elements/process-variables.md) that contains the ID of the new status of the asset. You can access it later in the process by referencing the ID you have set. Once you publish the workflow in Collibra, you can also update the value from the **Variables** section in the workflow [definition settings page](/workflows/managing-workflows-in-collibra/view-and-edit-workflow-definition-settings.md).
{% stepper %}
{% step %}
On the canvas, select the start event.
{% endstep %}
{% step %}
In the attribute bar, click **Form Properties**.\ :chevrons-right: The **Form properties** dialog box appears.
{% endstep %}
{% step %}
Click **+ Add item**
{% endstep %}
{% step %}
Enter the required information:
* **Id**: *statusId*
* **Name**: *The status ID of the deleted asset.*
* **Responsibilities**: *String*
* **Default**: *00000000-0000-0000-0000-000000005066*
* **Required**: Yes
* **Readable**: No
* **Writable**: Yes
{% endstep %}
{% step %}
Click **OK** to save the form property.
{% endstep %}
{% endstepper %}
### Create a script for your script task
The script changes the status of the selected asset to the one defined by the **statusId** variable.
{% stepper %}
{% step %}
On the canvas, select the script task.
{% endstep %}
{% step %}
In the attribute bar, click **Script**.
{% endstep %}
{% step %}
Add the following script:
```groovy
import com.collibra.dgc.core.api.dto.instance.asset.ChangeAssetRequest
assetApi.changeAsset(ChangeAssetRequest.builder()
.id(item.id)
.statusId(string2Uuid(statusId))
.build()
);
```
{% endstep %}
{% step %}
Click **OK** to save the script.
{% endstep %}
{% endstepper %}
{% hint style="success" %}
Save your work.
{% endhint %}
{% hint style="success" %}
For more information about scripts, see the [Introduction to Builders](/tutorials/introduction-to-builders.md) tutorial.
{% endhint %}
## Publish your workflow
You publish a workflow directly from the Workflow Designer to your Collibra environment:
{% stepper %}
{% step %}
In Workflow Designer, open a workspace.
{% endstep %}
{% step %}
For the app you want to publish, select
{% endstep %}
{% endstepper %}
### Add a form property to your start event
You use a form property in the start event to define the [process variable](/workflows/creating-workflows/workflow-basic-configuration-elements/process-variables.md) that contains the ID of the new status of the asset. You can access it later in the process by referencing the ID you have set. Once you publish the workflow in Collibra, you can also update the value from the **Variables** section in the workflow [definition settings page](/workflows/managing-workflows-in-collibra/view-and-edit-workflow-definition-settings.md).
{% stepper %}
{% step %}
On the canvas, select the start event.
{% endstep %}
{% step %}
In the attribute bar, click **Form Properties**.\ :chevrons-right: The **Form properties** dialog box appears.
{% endstep %}
{% step %}
Click **+ Add item**
{% endstep %}
{% step %}
Enter the required information:
* **Id**: *statusId*
* **Name**: *The status ID of the deleted asset.*
* **Responsibilities**: *String*
* **Default**: *00000000-0000-0000-0000-000000005066*
* **Required**: Yes
* **Readable**: No
* **Writable**: Yes
{% endstep %}
{% step %}
Click **OK** to save the form property.
{% endstep %}
{% endstepper %}
### Create a script for your script task
The script changes the status of the selected asset to the one defined by the **statusId** variable.
{% stepper %}
{% step %}
On the canvas, select the script task.
{% endstep %}
{% step %}
In the attribute bar, click **Script**.
{% endstep %}
{% step %}
Add the following script:
```groovy
import com.collibra.dgc.core.api.dto.instance.asset.ChangeAssetRequest
assetApi.changeAsset(ChangeAssetRequest.builder()
.id(item.id)
.statusId(string2Uuid(statusId))
.build()
);
```
{% endstep %}
{% step %}
Click **OK** to save the script.
{% endstep %}
{% endstepper %}
{% hint style="success" %}
Save your work.
{% endhint %}
{% hint style="success" %}
For more information about scripts, see the [Introduction to Builders](/tutorials/introduction-to-builders.md) tutorial.
{% endhint %}
## Publish your workflow
You publish a workflow directly from the Workflow Designer to your Collibra environment:
{% stepper %}
{% step %}
In Workflow Designer, open a workspace.
{% endstep %}
{% step %}
For the app you want to publish, select  more → Publish
{% endstep %}
{% step %}
Click **Publish App** to confirm and upload the workflow to the target environment.
{% endstep %}
{% endstepper %}
{% hint style="success" %}
The target environment is the Collibra environment you used to access the Workflow Designer.
{% endhint %}
{% hint style="danger" %}
Uploading a workflow with the same process ID as an existing workflow in Collibra replaces the existing workflow.
{% endhint %}
{% hint style="info" %}
Collibra does not accept two workflows with the same display name.
{% endhint %}
## Configure the workflow settings
To fine tune the workflow you must change the default configuration in Collibra:
{% stepper %}
{% step %}
On the main toolbar, click
more → Publish
{% endstep %}
{% step %}
Click **Publish App** to confirm and upload the workflow to the target environment.
{% endstep %}
{% endstepper %}
{% hint style="success" %}
The target environment is the Collibra environment you used to access the Workflow Designer.
{% endhint %}
{% hint style="danger" %}
Uploading a workflow with the same process ID as an existing workflow in Collibra replaces the existing workflow.
{% endhint %}
{% hint style="info" %}
Collibra does not accept two workflows with the same display name.
{% endhint %}
## Configure the workflow settings
To fine tune the workflow you must change the default configuration in Collibra:
{% stepper %}
{% step %}
On the main toolbar, click  →
→  **Settings**.\ :chevrons-right: The **Settings** page opens.
{% endstep %}
{% step %}
Click **Workflows**.\ :chevrons-right: The Workflows settings page appears on the **Definitions** tab page.
{% endstep %}
{% step %}
Select the **Delete asset** workflow.
{% endstep %}
{% step %}
On the workflow definition page, in the **Applies To** section, click **Edit**.
{% endstep %}
{% step %}
From the drop-down list, select **Asset**.
{% endstep %}
{% step %}
Click **Save**.\ :chevrons-right: The **Applies To** dialog box appears.
{% endstep %}
{% step %}
Click **Save**.
{% endstep %}
{% step %}
At the right of the title bar, click
**Settings**.\ :chevrons-right: The **Settings** page opens.
{% endstep %}
{% step %}
Click **Workflows**.\ :chevrons-right: The Workflows settings page appears on the **Definitions** tab page.
{% endstep %}
{% step %}
Select the **Delete asset** workflow.
{% endstep %}
{% step %}
On the workflow definition page, in the **Applies To** section, click **Edit**.
{% endstep %}
{% step %}
From the drop-down list, select **Asset**.
{% endstep %}
{% step %}
Click **Save**.\ :chevrons-right: The **Applies To** dialog box appears.
{% endstep %}
{% step %}
Click **Save**.
{% endstep %}
{% step %}
At the right of the title bar, click  to enable the workflow.
{% endstep %}
{% endstepper %}
## Additional resources
* Downloads:
* [Soft delete asset workflow-bar.zip](https://cdn.collibra.com/developer/Soft%20delete%20asset%20workflow-bar.zip) to publish in Collibra or edit in the Workflow Designer.
* [DeleteAsset.bpmn](https://cdn.collibra.com/developer/DeleteAsset.bpmn) to edit using the Eclipse plug-in.
* Read the [Workflow Designer documentation](/workflows/workflows-at-collibra.md).
* Read the [Introduction to builders](/tutorials/introduction-to-builders.md) tutorial.
---
# Agent Instructions
This documentation is published with GitBook. GitBook is the documentation platform designed so that both humans and AI agents can read, navigate, and reason over technical content effectively. Learn more at gitbook.com.
## Querying This Documentation
If you need additional information that is not directly available in this page, you can query the documentation by asking a question.
Perform an HTTP GET request on the following URL with the `ask` and `goal` query parameters:
```
GET https://developer.collibra.com/tutorials/soft-delete-workflow.md?ask=&goal=
```
`ask` is the immediate question: it should be specific, self-contained, and written in natural language.
`goal` is what the user is ultimately trying to achieve, the reason they need the answer. Sharing it helps GitBook give you a better, more relevant answer. A goal is most helpful when it describes the outcome the user wants rather than restating the question. For example, with `ask=how do I create an API token`, a goal like `automate deployments from our CI pipeline` lets GitBook tailor the answer to that use case.
The response will contain a direct answer to the question and relevant excerpts and sources from the documentation.
Use this mechanism when the answer is not explicitly present in the current page, you need clarification or additional context, or you want to retrieve related documentation sections.
to enable the workflow.
{% endstep %}
{% endstepper %}
## Additional resources
* Downloads:
* [Soft delete asset workflow-bar.zip](https://cdn.collibra.com/developer/Soft%20delete%20asset%20workflow-bar.zip) to publish in Collibra or edit in the Workflow Designer.
* [DeleteAsset.bpmn](https://cdn.collibra.com/developer/DeleteAsset.bpmn) to edit using the Eclipse plug-in.
* Read the [Workflow Designer documentation](/workflows/workflows-at-collibra.md).
* Read the [Introduction to builders](/tutorials/introduction-to-builders.md) tutorial.
---
# Agent Instructions
This documentation is published with GitBook. GitBook is the documentation platform designed so that both humans and AI agents can read, navigate, and reason over technical content effectively. Learn more at gitbook.com.
## Querying This Documentation
If you need additional information that is not directly available in this page, you can query the documentation by asking a question.
Perform an HTTP GET request on the following URL with the `ask` and `goal` query parameters:
```
GET https://developer.collibra.com/tutorials/soft-delete-workflow.md?ask=&goal=
```
`ask` is the immediate question: it should be specific, self-contained, and written in natural language.
`goal` is what the user is ultimately trying to achieve, the reason they need the answer. Sharing it helps GitBook give you a better, more relevant answer. A goal is most helpful when it describes the outcome the user wants rather than restating the question. For example, with `ask=how do I create an API token`, a goal like `automate deployments from our CI pipeline` lets GitBook tailor the answer to that use case.
The response will contain a direct answer to the question and relevant excerpts and sources from the documentation.
Use this mechanism when the answer is not explicitly present in the current page, you need clarification or additional context, or you want to retrieve related documentation sections.