Microsoft Entra ID authorization for SCIM
Collibra supports only basic, bearer token authentication with JWT, and OAuth.
The following table summarizes acquiring and using JWT in Collibra REST API requests.
Initial setup
Create a client credential account with a secret in your IdP.
Determine the JSON Web Key Set (JWKS) endpoint URL for your IdP.
Register the JWKS endpoint with Collibra.
Create a user in Collibra for your client application account.
Provide a meaningful first and last name to identify that this is a service account.
When your application starts
Authenticate your client application with your IdP.
Save the returned access token for use in REST API calls.
When your application calls the Collibra REST APIs
Include the JWT token in the authorization HTTP header as a bearer token.
If the API call responds with unauthorized, the access token or JWKS credentials may have expired. Re-authenticate and retry the request.
Obtain the client secret
Sign in to your Microsoft Entra admin center.
Select Entra ID → App registrations → New registration.
On the Register an application page, enter the required information:
Name: The name of your application.
Supported account types: Select Accounts in this organizational directory only (Single tenant).
Click Register.
In the Manage section of your application page, select Certificates & secrets → Client secrets.
Click New client secret.
In the Add a client secret dialog box, enter the required information:
Description: The description of your client secret.
Expires: Select an expiry period.
Click Add. Your new secret is generated and added to the Client secrets list.
Copy the Value of your secret for future use.
Obtain the client and tenant IDs
Sign in to your Microsoft Entra admin center.
Select Entra ID → App registrations → your application.
In the Overview section, copy the Application (client) ID and Directory (tenant) ID values for future use.
Obtain the jwks_uri parameter
Request a verbose output from https://login.microsoftonline.com/<tenant_id>/.well-known/openid-configuration.
From the JSON response, copy the jwks_uri value for future use.
Obtain the typ, iss, sub, and aud parameters
Send a POST request to the https://login.microsoftonline.com/<tenant_id>/oauth2/v2.0/token endpoint using your tenant ID, client ID, and client secret:
curl -X POST -H 'Content-Type: application/x-www-form-urlencoded' \
https://login.microsoftonline.com/<tenant_id>/oauth2/v2.0/token \
-d 'client_id=<client_id>' \
-d 'grant_type=client_credentials' \
-d 'scope=2ff814a6-3304-4ab8-85cb-cd0e6f879c1d/.default' \
-d 'client_secret=<client_secret>'curl -X POST -H 'Content-Type: application/x-www-form-urlencoded' \
https://login.microsoftonline.com/<tenant_id>/oauth2/v2.0/token \
-d 'client_id=<client_id>' \
-d 'grant_type=client_credentials' \
-d 'scope=2ff814a6-3304-4ab8-85cb-cd0e6f879c1d%2F.default' \
-d 'client_secret=<client_secret>'From the response, copy the access token.
Decode the JWT with an application such as JWT.io.
Copy the typ, iss, sub, and aud parameters for future use.
Register the JWKS endpoint with Collibra
Follow the instructions to Register the JWKS endpoint with Collibra and use the following values:
JSON Web Key Set URL
The jwks_uri from the verbose output.
JWT Token Types
The typ parameter from the decoded JWT.
JWT Issuer
The iss parameter from the decoded JWT without the trailing tenant ID.
JWT Audience
The aud parameter from the decoded JWT.
Create a user in Collibra
Follow the instructions to Create a user in Collibra for your client application account:
Username
The sub parameter from the decoded JWT.
User groups
Assign the user to a group that has elevated permissions such as Sysadmin or one that has similar permissions.
Create a SCIM application
Create a new SCIM application and authorize it:
Sign in to your Microsoft Entra admin center.
Select Entra ID → Enterprise applications.
Select New application → Create your own application.
In the Create your own application dialog box, enter the required information:
What's the name of your app?: The name of your application.
What are you looking to do with your application?: Select Integrate any other application you don't find in the gallery (Non-gallery).
Click Create.
Your newly created application appears in the list of Enterprise applications.
Collibra supports v1.0 Microsoft identity platform access tokens.
Authorize your SCIM application
From the list of applications, select your new application → Provisioning.
Select New configuration.
Enter the require information:
Provisioning mode: Automatic
Admin credentials:
Tenant URL: The endpoint of the CollibraSCIM API, for example https://<your_collibra_url>/rest/scim/v2.
Secret Token: Your JSON Web Token.
Click Test Connection. If your credentials are successfully verified, Microsoft Entra ID displays a confirmation message.
Click Save to complete the process.
Start and stop a provisioning job
Microsoft Entra access tokens are valid only for one hour and cannot be refreshed due to the Entra ID limitations on token refresh. The workaround to achieve users and groups provisioning and deprovisioning is to start and stop the provisioning job based on your need:
Select Entra ID → Enterprise applications → your application → Provisioning.
On the Provisioning page, in the Manage provisioning section, select Update credentials.
Enter the new token.
Click Test Connection. If your credentials are successfully verified, Microsoft Entra ID displays a confirmation message.
Click Save to complete the process.
Return to the Provisioning page and click Start provisioning to perform the initial synchronization of Collibra users.
Wait for the process to complete and validate the results in Collibra.
Click Stop provisioning.
Generate a new client secret and update the credentials.
Start the provisioning again when you need to perform another synchronization of users and groups.
Register an application
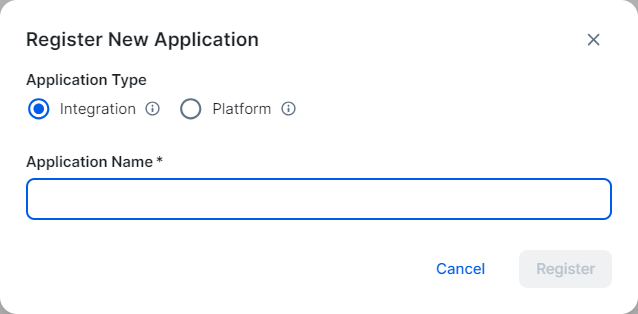
To access Collibra public APIs without requiring individual user credentials you must first register your application in Collibra and obtain a client ID and client secret that are required to request an access token. You can register new applications in Settings → OAuth Applications → Manage OAuth:
Click Register New Application The Register New Application dialog box appears.

Enter the required information:
Application Type
Integration: For applications that are developed by you to access and interact with the Collibra public APIs, facilitating integration with our product suite.
Application Name
The name of you application, used to identify it in the list of registered applications.
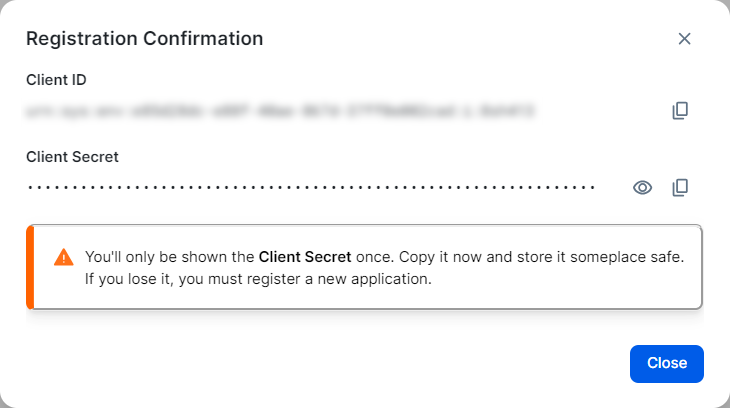
Click Register. The Registration Confirmation dialog box appears.

Copy and safely store the Client ID and Client Secret.
This is the only time you are able to see the client secret.
Create a SCIM application
Create a new SCIM application and authorize it:
Sign in to your Microsoft Entra admin center.
Select Entra ID → Enterprise applications.
Select New application → Create your own application.
In the Create your own application dialog box, enter the required information:
What's the name of your app?: The name of your application.
What are you looking to do with your application?: Select Integrate any other application you don't find in the gallery (Non-gallery).
Click Create.
Your newly created application appears in the list of Enterprise applications.
Authorize your SCIM application
From the list of applications, select your new application → Provisioning.
Select New configuration.
Enter the require information:
Provisioning mode: Automatic
Admin credentials:
Authentication Method: Select OAuth2 Client Credentials Grant.
Tenant URL: The endpoint of the CollibraSCIM API, including the Entra ID optimization flag, for example https://<your_collibra_url>/rest/scim/v2?aadOptscim062020.
Token Endpoint: The token endpoint of the Collibra OAuth 2.0 Authorization API: https://<your_collibra_url>/rest/oauth/v2/token.
Client Identifier: The URL encoded value of the Client ID of your registered application in Collibra, for example urn%3Asys%3Aenv%3A4a1261cc-5bc0-44c0-9b85-fc4942ae7c58%3Ai%3Aq2724e.
Client Secret: The secret that provided by Collibra during the application registration process.
Click Test Connection. If your credentials are successfully verified, Microsoft Entra ID displays a confirmation message.
Click Save to complete the process.
Map SCIM app attributes
Sign in to your Microsoft Entra admin center.
Search for and select Entra ID → Enterprise applications → your application → Provisioning.
Select Mappings → Provision API:Users.
On the Attribute Mapping page, edit or add your desired mappings.
Collibra supports a limited number of SCIM attributes.
User attribute mapping
Microsoft Entra ID AttributeAPI AttributeuserPrincipalNameuserNameSwitch([IsSoftDeleted],,"False" "True","True","False")activeCoalesce([mail], [userPrincipalName])emails[type eq "work"].valuegivenNamename.givenNamesurnamename.familyNamejobTitletitledepartmenturn:ietf:params:scim:schemas:extension:enterprise:2.0:User:departmentstreetAddressaddresses[type eq "work"].streetAddresscityaddresses[type eq "work"].localitystateaddresses[type eq "work"].regionpostalCodeaddresses[type eq "work"].postalCodecountryaddresses[type eq "work"].countrytelephoneNumberphoneNumbers[type eq "work"].valuemobilephoneNumbers[type eq "mobile"].valuefacsimileTelephoneNumberphoneNumbers[type eq "fax"].valueotherMailsemails[type eq "other"].valuepreferredLanguagelocaleemployeeIdexternalId
Collibra users have a single email address and an additional list of email addresses. In contrast, SCIM uses a list of email addresses. If the SCIM list contains only one email address or one of the email addresses is marked as primary, that email address becomes the Collibra user email address. If the SCIM list contains multiple email addresses and none is marked as primary, the operation returns an error.
Group attribute mapping
Microsoft Entra ID AttributeAPI AttributedisplayNamedisplayNamemembersmembersYou cannot assign roles to users via SCIM. However, you can manage groups and group membership in your IdP and disable the Groups DGC managed Console configuration option. Following the initial provisioning, your IdP groups are available in Collibra and you can start assigning roles to them.
Click Save to complete the process.
Additional resources
Last updated
Was this helpful?