Create data with Collibra REST API
In this tutorial you create a community, a domain, some assets and definitions in Collibra Data Intelligence Cloud using the Collibra REST API.
curl -X POST \
  https://<your_dgc_environment_url>/rest/2.0/communities \
  -H 'Content-Type: application/json' \
  -d '{
	"name": "Finance",
	"description": "The part of the organization that manages its money."
}'
You start by logging in and creating a root community. You create a domain within the community and add an asset and a definition for that asset. You then learn to perform bulk operations, creating multiple sub-communities and domains.
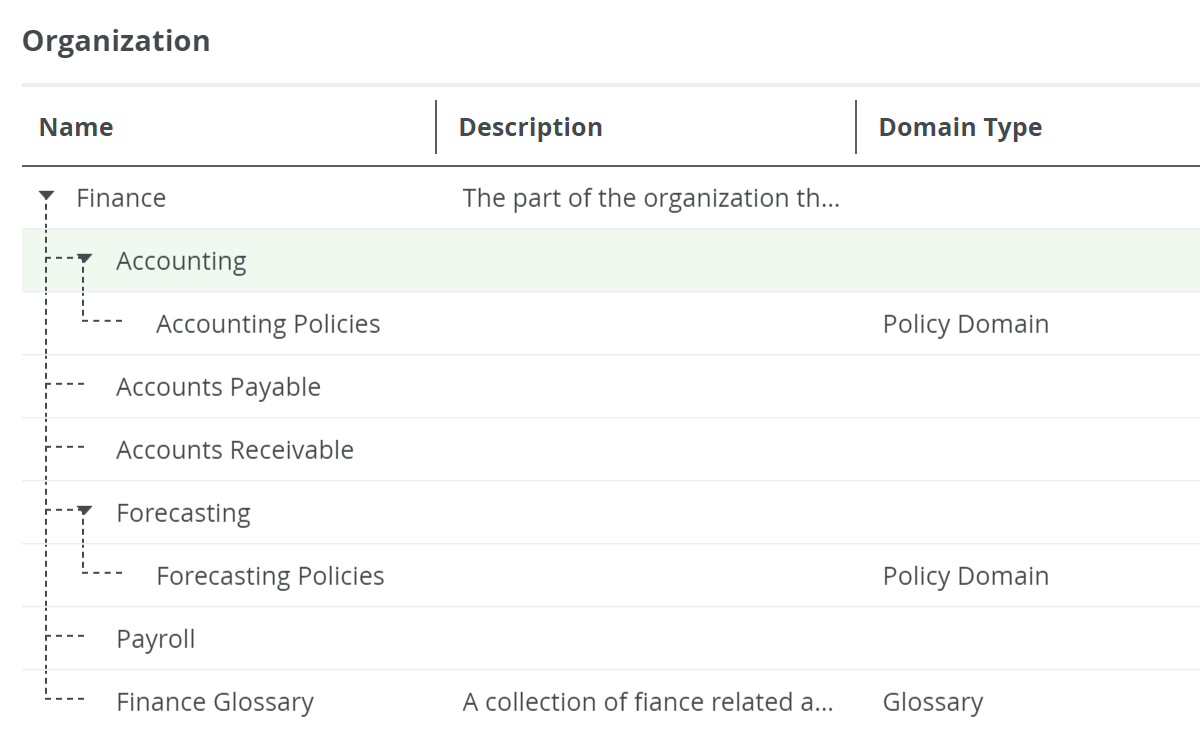
The goal is to have a structure such as the one below in your Collibra Data Intelligence Cloud:
Prerequisites
- Access to Collibra.
- Postman or an alternative HTTP API client.
Some references might be specific to the Postman application.
For more information on how to install Postman and establish an authentication session, see the Collibra REST API authentication tutorial.
The API documentation
The API references are part of your Collibra Platform environment. You need to be logged in to access them.
To access the API documentation:
| User access | API documentation |
|---|---|
| Sysadmin role |
In the top-right corner of any Collibra page, click |
| All roles | In a browser, go to https://<your_collibra_platform_url>/docs/index.html. |
Authenticate
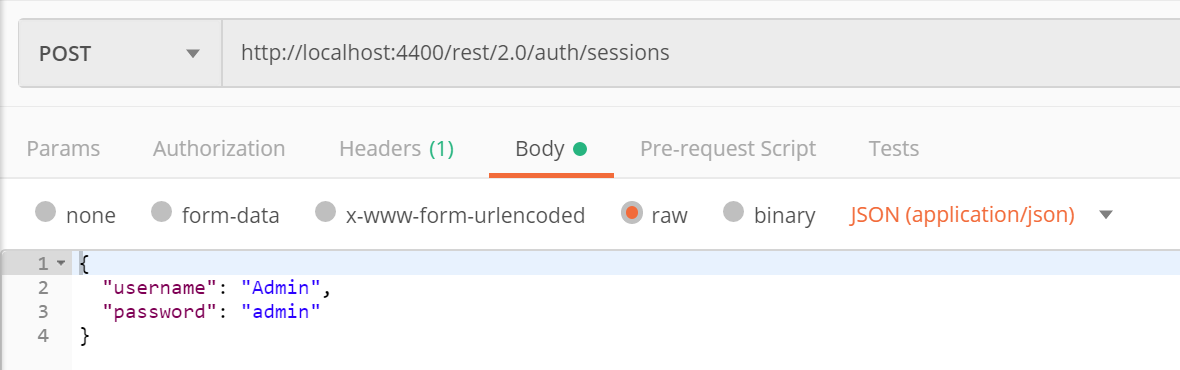
To authenticate the user, use the Authentication resource.
POST https://<your_dgc_environment_url>/rest/2.0/auth/sessionsYou must provide the username and the password in a JSON body.
{
	"username": "...",
	"password": "..."
}
For more information about authentication, see the Collibra RSET API authentication tutorial.
Create a community
In this section, you create a root community named Finance and give it a meaningful description. A root community in one that does not have a parent community.
curl -X POST \
  https://<your_dgc_environment_url>/rest/2.0/communities \
  -H 'Content-Type: application/json' \
  -d '{
	"name": "Finance",
	"description": "The part of the organization that manages its money."
}'
To create a community, use the POST method and the /communities endpoint of the Communities resource.
POST https://<your_dgc_environment_url>/rest/2.0/communities
To successfully create a root community, you must provide the community name in a JSON body. It is not mandatory, but good practice to have meaningful descriptions for the Collibra Data Intelligence Cloud resources you create.

The parameters used to create the root community are:
| Parameter | Mandatory | Type | Description |
|---|---|---|---|
| description | No | String | Describes the community. |
| name | Yes | String | Sets the name of the community. Must be unique. |
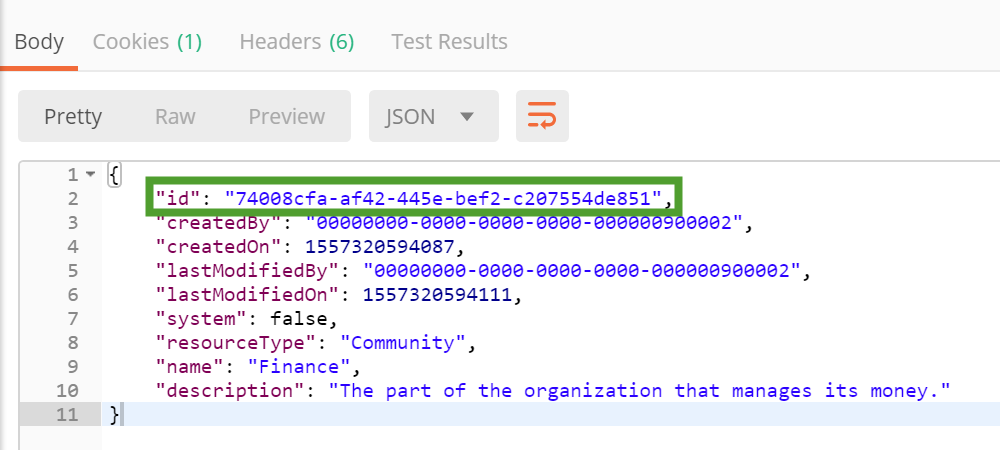
The response contains information about the newly created community, including the Universally Unique Identifier (UUID), which you use in the next steps to identify the Finance community.
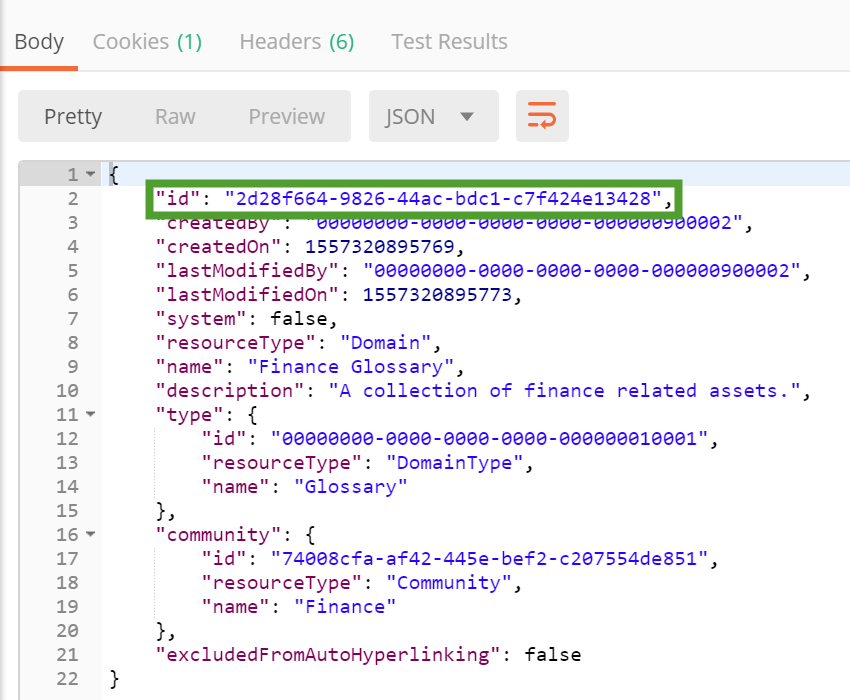
Create a domain
Domains are logical groupings of assets. They belong to communities and have different domain types. In this section, you create a Glossary domain named Finance Gloassary, which belongs to the Finance community.
curl -X POST \
  https://<your_dgc_environment_url>/rest/2.0/domains \
  -H 'Content-Type: application/json' \
  -d '{
	"name": "Finance Glossary",
	"description": "A collection of finance related assets.",
	"communityId": "<Finance_community_id>",
	"typeId": "00000000-0000-0000-0000-000000010001"
}'
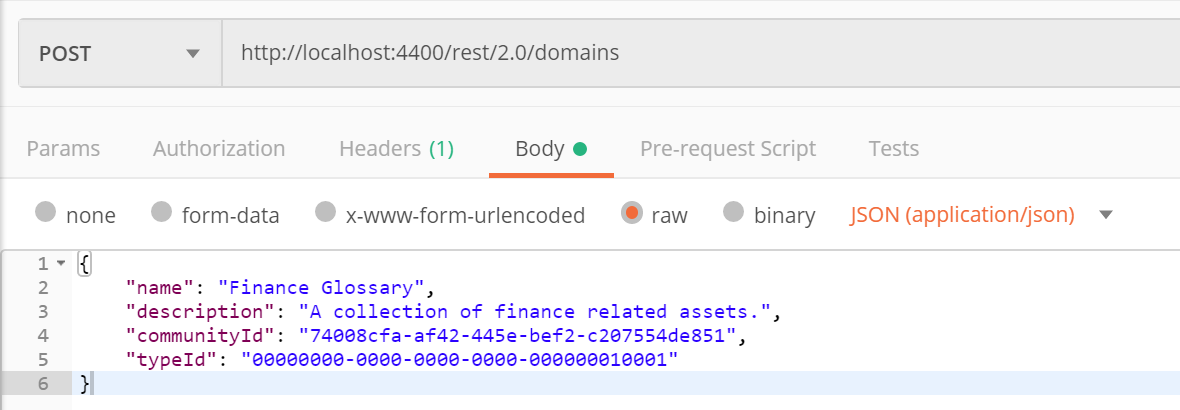
To create a domain, use the POST method and the /domains endpoint of the Domains resource.
POST https://<your_dgc_environment_url>/rest/2.0/domains
To successfully create a domain, you must provide the domain name, the domain type ID and the community ID the domain belongs to.
For the Finance Glossary domain, use the community ID that you received after creating the Finance community and 00000000-0000-0000-0000-000000010001 as the typeId. This is the packaged UUID of the Glossary domain type.
The parameters used to create the domain are:
| Parameter | Mandatory | Type | Description |
|---|---|---|---|
| communityId | Yes | UUID | Sets the community the domain belongs to. The community must exist. |
| description | No | String | Describes the domain. |
| name | Yes | String | Sets the name of the domain. Must be unique within the same community. |
| typeId | Yes | UUID | Sets the domain type. |
The response contains information about the newly created domain, including the Universally Unique Identifier (UUID), which you use in the next steps to identify the Finance Glossary domain.
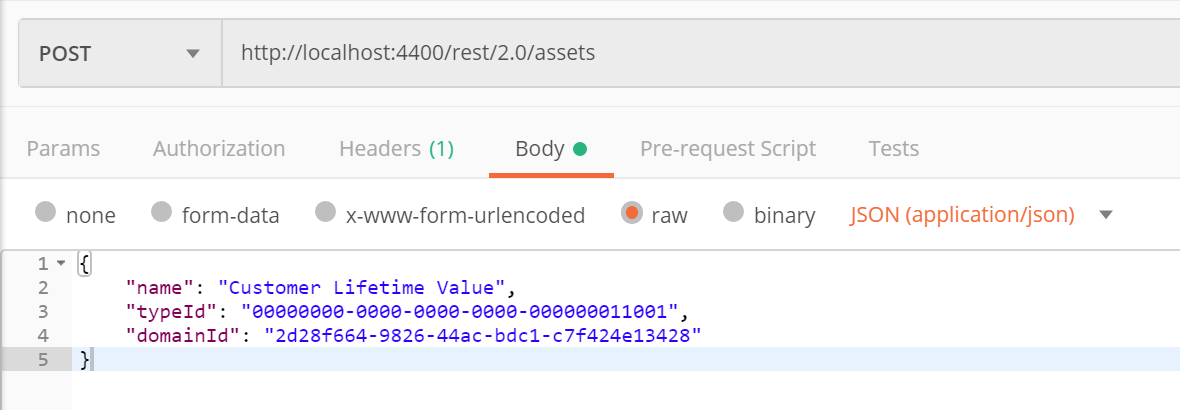
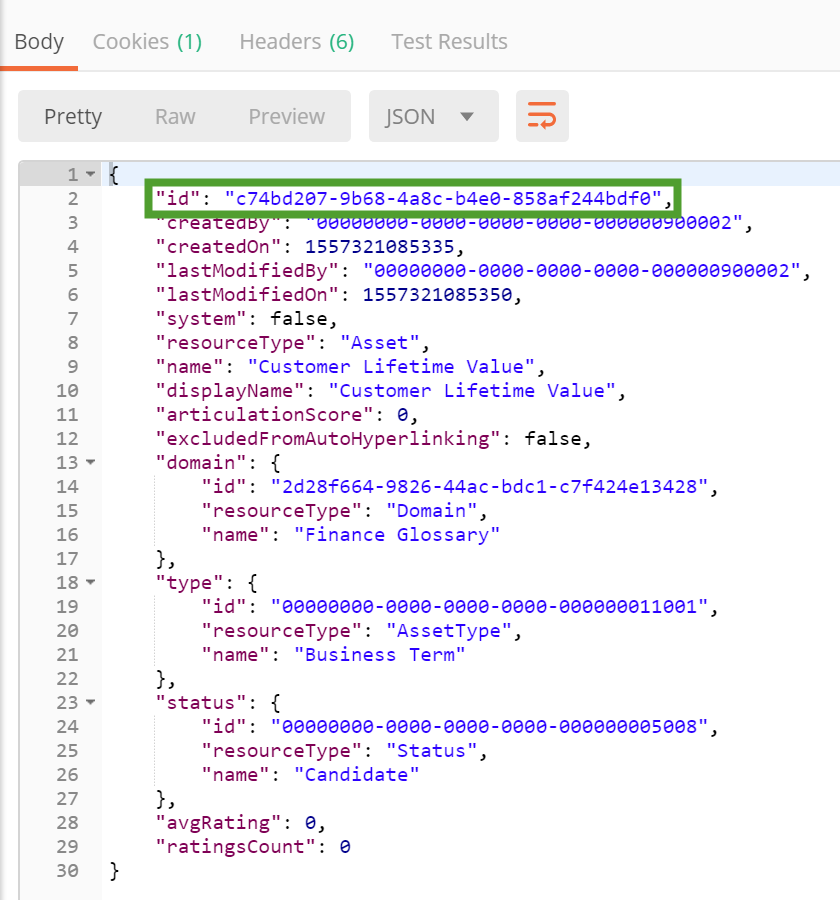
Create an asset
Now that you have created a glossary, you can start adding assets to it. In this section you add a business term in the Finance Glossary domain.
curl -X POST \
  https://<your_dgc_environment_url>/rest/2.0/assets \
  -H 'Content-Type: application/json' \
  -d '{
	"name": "Customer Lifetime Value",
	"typeId": "00000000-0000-0000-0000-000000011001",
	"domainId": "<Finance_Glossary_domain_id>"
}'
To create an asset, use the POST method and the /assets endpoint of the Assets resource.
POST https://<your_dgc_environment_url>/rest/2.0/assets
To successfully create an asset, you must provide the asset name, the asset type ID and the domain ID the asset belongs to.
For the Customer Lifetime Value asset, use the domain ID that you received after creating the Finance Glossary domain and 00000000-0000-0000-0000-000000011001 as the typeId. This is the packaged UUID of the Business Term asset type.
The parameters used to create the asset are:
| Parameter | Mandatory | Type | Description |
|---|---|---|---|
| domainId | Yes | UUID | Sets the domain the asset belongs to. The domain must exist. |
| name | Yes | String | Sets the name of the asset. Must be unique within the same domain. |
| typeId | Yes | UUID | Sets the asset type. |
The response contains information about the newly created asset, including the Universally Unique Identifier (UUID), which you will use in the next steps to identify the Customer Lifetime Value asset.
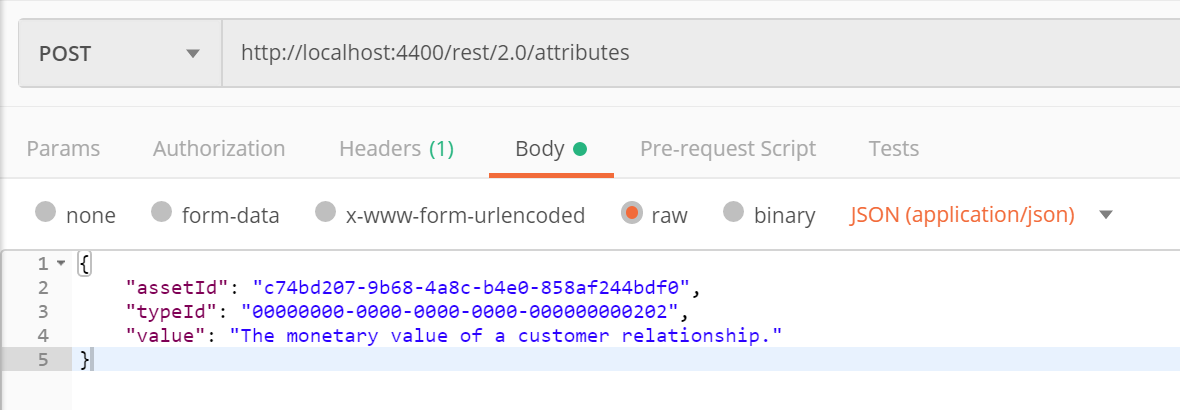
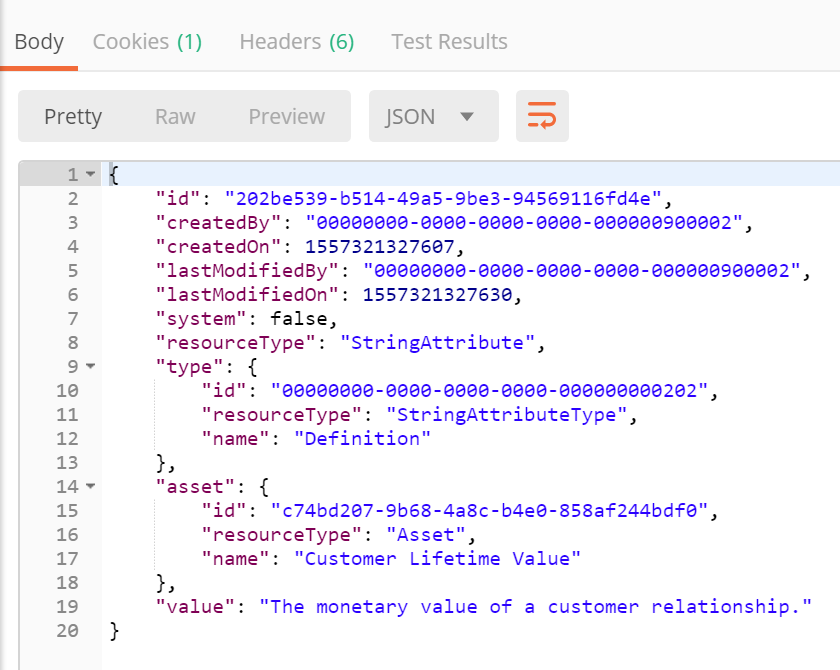
Create a definition
The definition of an asset is just one of its attributes. In this section you add a definition to the Customer Lifetime Value asset.
curl -X POST \
  https://<your_dgc_environment_url>/rest/2.0/attributes \
  -H 'Content-Type: application/json' \
  -d '{
	"assetId": "<Customer_Lifetime_Value_asset_id>",
	"typeId": "00000000-0000-0000-0000-000000000202",
	"value": "The monetary value of a customer relationship."
}'
To create a definition, use the POST method and the /attributes endpoint of the Attributes resource.
POST https://<your_dgc_environment_url>/rest/2.0/attributes
To successfully create a definition, you must provide the definition, the attribute type ID, and the asset ID the definition is for.
For the Customer Lifetime Value definition, use the asset ID that you received after creating the Customer Lifetime Value asset and 00000000-0000-0000-0000-000000000202 as the typeId. This is the packaged UUID of the Definition attribute type.
The parameters used to create the definition are:
| Parameter | Mandatory | Type | Description |
|---|---|---|---|
| assetyId | Yes | UUID | Identifies the asset that the attribute belongs to. The asset must exist. |
| typeId | Yes | UUID | Sets the attribute type. |
| value | Yes | Object | Sets the value of the attribute. The expected type for a definition is string. |
The response contains information about the newly created definition.
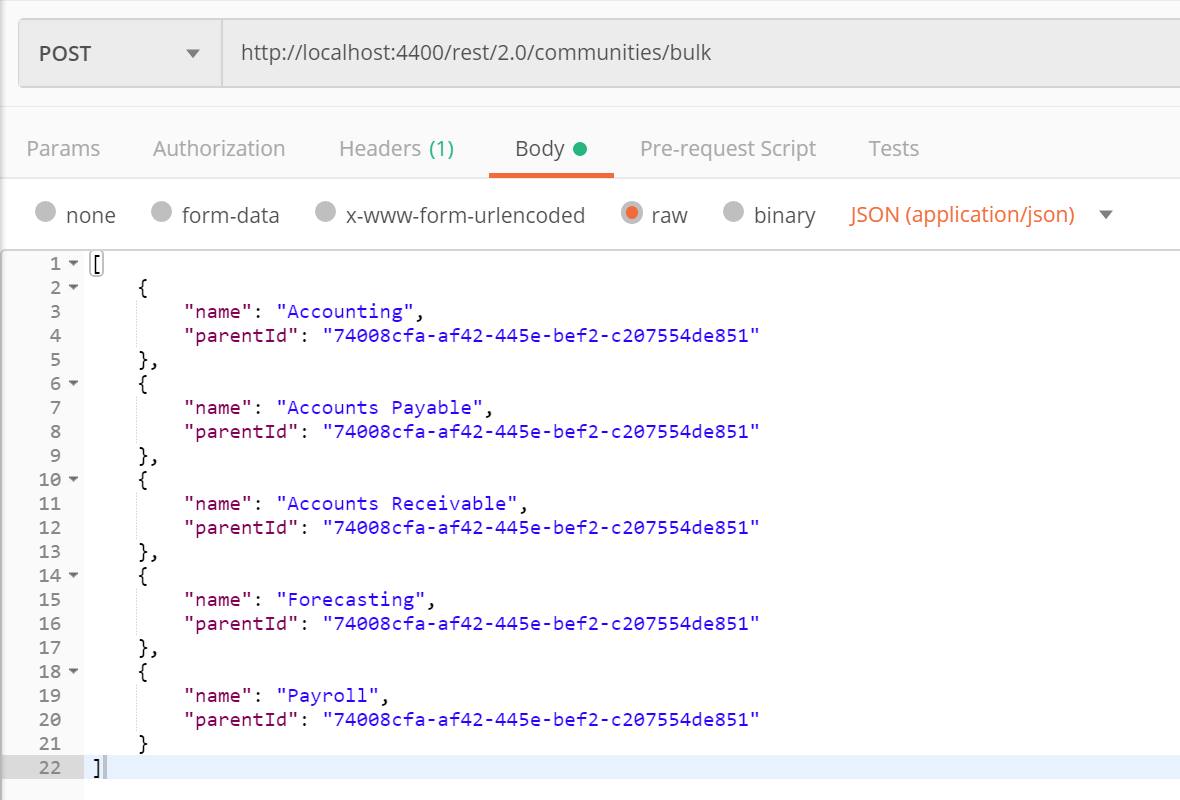
Create multiple resources
To create multiple resources with a single call, use the POST method and the /bulk endpoint of the resource you need to create. Provide the required parameters in a JSON array.
Let's add the missing pieces to the Finance community by creating a series of sub-communities and a couple of domains.
To create the Accounting, Accounts Payable, Accounts Receivable, Forecasting and Payroll sub-communities, you must provide their names and the ID of the parent community. You know the ID of the parent community from the response you received after creating the Finance community.
curl -X POST \
  https://<your_dgc_environment_url>/rest/2.0/communities/bulk \
  -H 'Content-Type: application/json' \
  -d '[
	{
		"name": "Accounting",
		"parentId": "<Finance_community_id>"
	},
	{
		"name": "Accounts Payable",
		"parentId": "<Finance_community_id>"
	},
	{
		"name": "Accounts Receivable",
		"parentId": "<Finance_community_id>"
	},
	{
		"name": "Forecasting",
		"parentId": "<Finance_community_id>"
	},
	{
		"name": "Payroll",
		"parentId": "<Finance_community_id>"
	}
]'
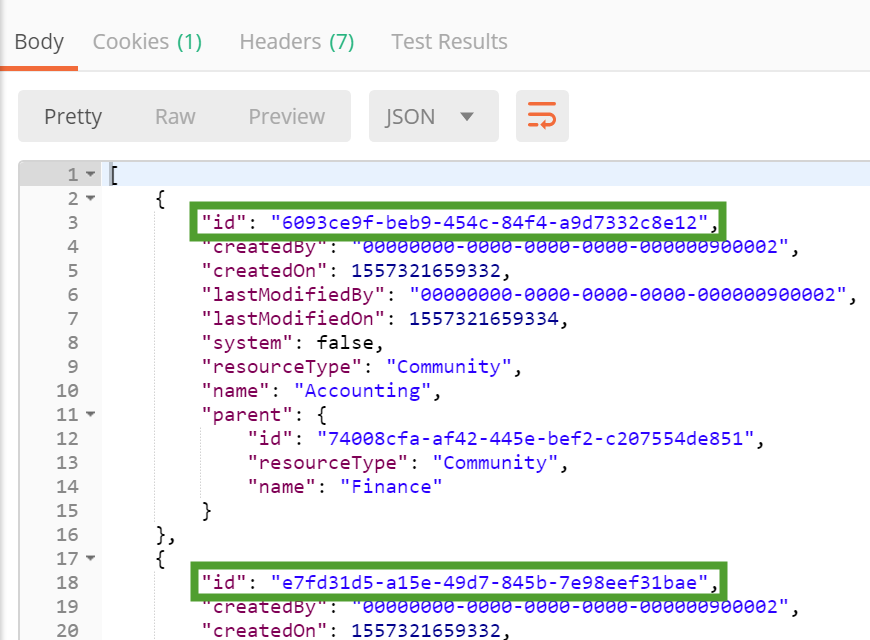
The response contains information about the newly created communities, including the Universally Unique Identifier (UUID) for each of them.
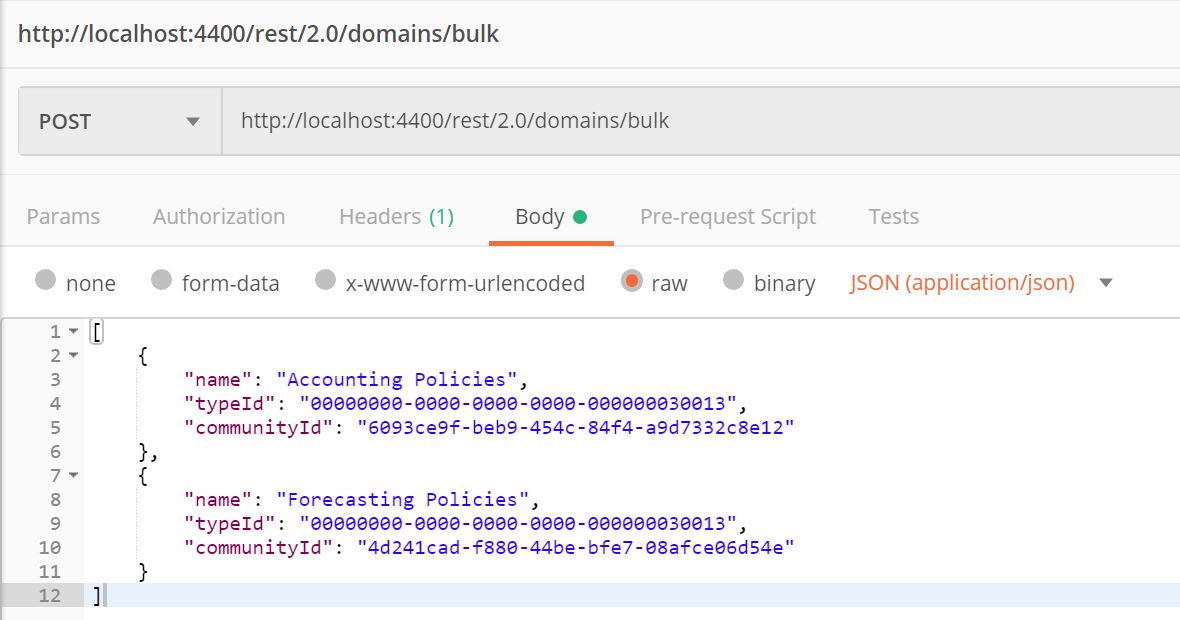
To create the Accounting Policies and Forecasting Policies domains, you must provide their names, the community IDs the domains belong to and the domain type IDs. Use the community IDs that you received after creating the sub-communities and 00000000-0000-0000-0000-000000030013 as the typeId. This is the packaged UUID of the Policy domain type.
curl -X POST \
  https://<your_dgc_environment_url>/rest/2.0/domains/bulk \
  -H 'Content-Type: application/json' \
  -d '[
	{
		"name": "Accounting Policies",
		"typeId": "00000000-0000-0000-0000-000000030013",
		"communityId": "<Accounting_community_id>"
	},
	{
		"name": "Forecasting Policies",
		"typeId": "00000000-0000-0000-0000-000000030013",
		"communityId": "<Forecasting_community_id>"
	}
]'
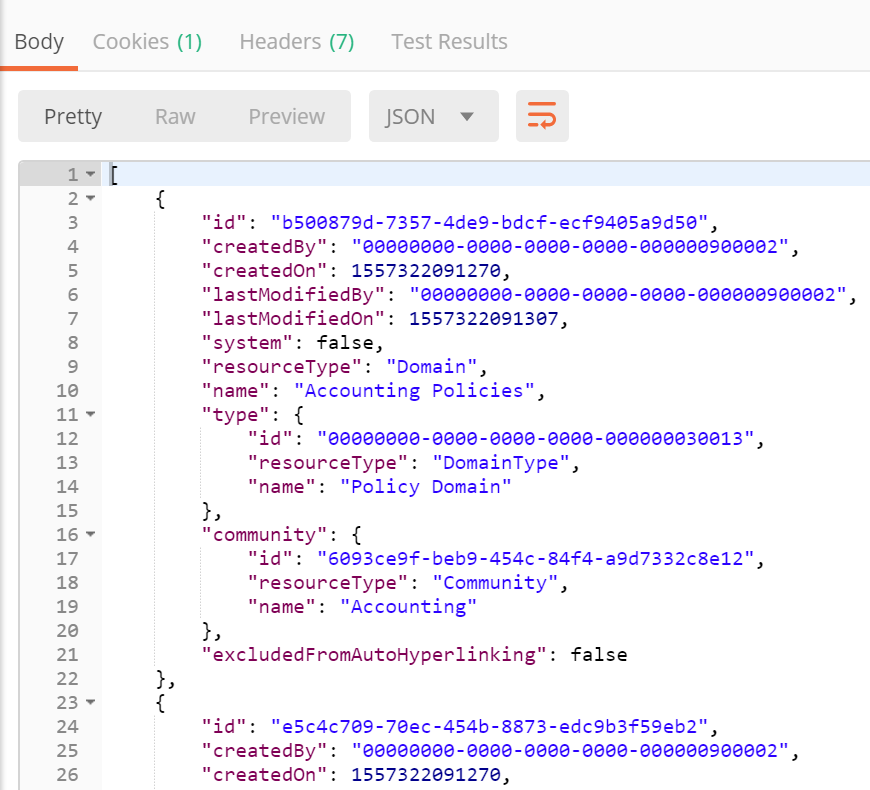
The response contains information about the newly created domains.
Response codes
Common response codes when creating resources are:
| Code | Meaning |
|---|---|
| 201 | The resource has been created. |
| 400 | Bad request. The body of the response contains details about the error. |
| 401 | The current user is not authenticated. |
Summary
By following this tutorial you have used the Collibra REST API to:
- Create a root community with a meaningful description.
- Add sub-communities to a root community.
- Create domains within communities.
- Add assets to domains.
- Add definitions to assets.
- Get the UUID of newly created Collibra resources from the response of an API call.
Next steps
The next tutorial guides you through an example of how to retrieve data from Collibra Data Intelligence Cloud and add an asset via the Collibra REST API.
Additional resources
- Consult the REST API documentation provided with your version of Collibra Data Intelligence Cloud.
- Read the Collibra Administration Guide API documentation.